1. Introduction
This is a tutorial to show a step by step example for an initial setup in the cloud. By following this guide step by step you’ll have a service running in the cloud at the end.
If you have questions please contact me (alexander.schwartz@gmx.net), discuss it on GitHub (https://github.com/ahus1/saltconsul-examples/) or even submit pull requests. You can meet me in person at conferences and user group meetings.
1.1. Szenario
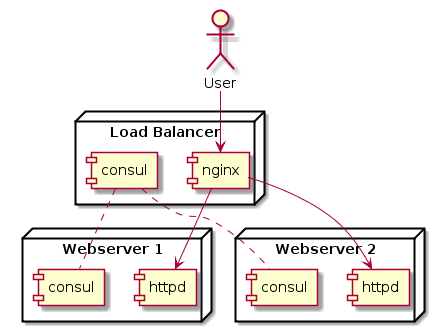
The following scenario will be implemented step by step: A user will use his or her browser to contact a load balancer. This load balancer will know about two web servers and will forward the requests accordingly. See the following picture for details.
1.2. Tools and providers we use
1.2.1. DigitalOcean
There are multiple hosting providers in the cloud. A very simple configuration for a start can be found at DigitalOcean.
They offer a server starting from 5 USD a month with hourly billing. All functionality is available using an API. DigialOcean has been integrated in several automation tools already.
1.2.2. Hashicorp’s Terraform
The first step is to create a first server in the cloud with an initial setup. A tool that is suited for this Terraform.
It allows you to define the resources of your cloud infrastructure in a short and concise format in a text file. You can use it to create and update your infrastructure in the cloud.
1.2.3. Saltstack’s Salt
Once the server has been set up, it needs to be "provisioned", meaning that the all software and configuration settings are being applied. There are tools like Chef, Puppet and Ansible for this. A very recent tool to do this is Salt.
Again, this allows us to define the resource of the cloud infrastructure in a short an concise format in a text file. You can use it to create, update and manage your infrastructure in the cloud.
1.2.4. Hashicorp’s Consul
Once all the servers have been set up and provisioned, they need to know about each other, and they need to be monitored. A tool that is well suited for cloud environments like this is Consul.
It runs as a sidecar next to each service and monitors the service and the host it is running on.
Using Consul the load balancer will be aware of the different web servers it can forward requests to.
1.2.5. CentOS Linux
The Linux distribution used here is CentOS Linux Version 7. It is derived from the sources of RedHat Enterprise Linux and is freely available. The new servers that we spin up here are all based on this distribution. I have chosen this Linux distribution as RedHat Enterprise Linux and CentOS are very present in the enterprises I have worked for. CentOS might not contain the very latest versions of several software packages, nevertheless this tutorial shows that all this works as well. It will also work with different flavors of Linux, although some of the names of the packages that are installed here will have different names. Consul and Salt will also work on Windows machines.
1.2.6. Apache httpd
Apache httpd is used as a web server in this setup. It will only serve static pages. You are free to extend this setup to enhance it to serve dynamic pages i.e. with PHP, or exchange it with an application server like Apache Tomcat. The load balancer will still work as expected.
1.2.7. NGINX
NGINX is a web server that can be used to serve static pages, but it is also very popular to act as reverse proxy. As a reverse proxy it is the contact for the users on the internet. It forwards all incoming requests to backend web servers.
2. Getting started
In order to get started you’ll need to register yourself at the cloud provider DigitalOcean and create yourself a SSH key.
2.1. Project’s directory
Please create an empty directory on your hard drive. Please place all files you create inside this directory or in sub directories.
Please avoid blanks or other special characters in the path name. This might confuse some programs.
2.2. Setup Git
It’s a good practice to save intermediate states when you work with source code files. To do this it is very handy to use git.
Please install TortoiseGit to do this. Please choose "Git Create repository here…" from your Explorer’s context menu to setup a local Git repository. This will not be shared with anybody. But it allows you to go back to any previous step during this tutorial. Please commit the current state of your work after every step to be able to do this.
2.3. Create a SSH key
When you want to access a command line on a Linux server, you’ll use secure shell (SSH) to access it. It is possible to use a username and password combination to log in. The more secure way is to use a public/private key pair. This has the following advantages:
-
A private key is very long, and therefore it can’t be guessed.
-
You can give away your public key to multiple servers to log in. Even if one of the servers is being compromised no-one will be able to impersonate yourself with the public key.
To do that please download PuTTY and PuTTYgen. Even if you already have a key pair, use the time to create a key pair just for this tutorial.
Once you run it, you’ll see the following dialoge shown in Creating a key with puttygen.
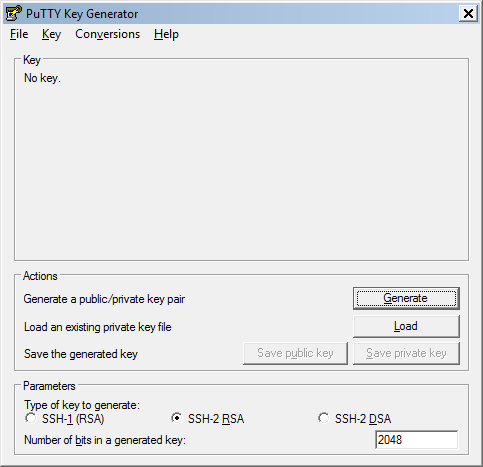
Please note the following settings:
-
The key type needs to be set to
SSH-2 RSA. DSA will not work as it is not supported by DigitalOcean. -
The number of bits in a generated key should be set to 2048. This key length will provide a very good level of security.
Press Generate and follow the instruction on the screen to create your key.
You’ll now need to save your private and your public key.
There are different formats to save your keys. In these examples you’ll need the OpenSSH format. This tutorial will not use a password for your keys.
Please proceed as follows:
-
create a local file called
id_rsa.pubin the project folder. Copy the contents of the field labeled "Public key for pasting into …" into this file. It should be one long line that looks like this:
ssh-rsa AAAAB3NzaC1yc2E...ANqTeH4scPYaQ== rsa-key-20150527
-
Choose to export your private key in the OpenSSH format. Choose
id_rsaas a filename and save it the project folder. It should be multiple lines that that looks like this:
-----BEGIN RSA PRIVATE KEY-----
MIIEoQIBAAKCAQEAxet1I80forMqWAj1gCexHQLoikdlMjUl8vM498vdfqrO1dHE
...
ZCRXXL2Q5mlJDSekPLRnrgPervaWBVW8v9Bqgybp9qIigDAQxA==
-----END RSA PRIVATE KEY-----
-
Choose Save private key to export your private key. Choose
id_rsa.ppkas a filename and save it the project folder. It should be multiple lines that that looks like this:
PuTTY-User-Key-File-2: ssh-rsa
...
Private-MAC: da8565a7228c35643a0047b001eafafb496e70f1
-
Please also save the fingerprint in a separate file. You’ll need that fingerprint later. Please save it in a file called
id_rsa.fingerprint. It should look like this:
ssh-rsa 2048 c8:df:df:...:83:d9:41:ce
2.4. Register at DigitalOcean
In order to run your virtual machines in the cloud you’ll need to set up an account with a hosting provider. DigitalOcean is used in this example. It specializes in running virtual machines in the cloud. For this they have multiple data centers around the world. In April 2015 they have opened a data center in Frankfurt am Main, Germany. There are almost no additional services except hosting DNS entries. This will give us the clear view we’ll need today.
Please use the following afiliate link to register at DigitalOcean: https://www.digitalocean.com/?refcode=532ccb598c03.
Using this link you’ll automatically receive 10 USD credit. If you have registered before, or if you haven’t received the credit, you could try to redeem ALLSSD10 as a promo code to receive 10 USD credit.
Once you have registered you should add some extra safety to your account by activating Google Authenticator. When you activate it, you will need in addition to username and password also a token that is created by an app on your mobile phone. This way no-one can log in to your DigitalOcean account with only your username and password.
In the security settings of DigitalOcean you should set up two-factor-authentication. You’ll need to install Google Authenticator on a mobile device to create a PIN code whenever you log in to your DigitalOcean account.
After you have registered you’ll need to register a payment method, for example a credit card. This is a matter of authenticating yourself.
As we’ll want to script everything we do in the following steps, please create an API token. This needs to be a token with read and write access. You’ll pass on this token to all programs that will access your account. At any point in time you can revoke it without changing your main password.
2.5. Preparations for Terraform
The next tool we’ll use will output ANSI escape characters on your screen. While Linux terminals support it, Windows doesn’t. To fix this please download the ANSICON tool.
Once downloaded, extract the contents to a bin subfolder of your project’s directory. Open a command shell and run bin\ansicon once to enable ANSI transformations.
2.6. Setup of Terraform and creating a first virtual machine
Terraform can be used to orchestrate multiple resources in the cloud. A text file is used to describe the configuration you want to have and you can then set up of tear down the whole setup in one step.
Terraform is distributed as a set of binaries. When you’re running Windows, download terraform_0.4.2_windows_amd64.zip from Terraform’s website https://www.terraform.io/.
Extract all files to a subdirectory called bin in your project’s folder. Please open a command line in your project’s folder and run bin\terraform. This will print out short usage instructions on how to use it.
Please create a first configuration file for Terraform called saltmaster.tf. In this file we’ll put all the information necessary to setup the first host in the cloud.
# setup connection to digitalocen using the API token
provider "digitalocean" {
    token = "cb93...f552"
}

# Fingerprint of the key, just to have it at hand. Please exchange it with your key
# "c8:df:df:...:d9:41:ce"
# public DigitalOcean SSH key
resource "digitalocean_ssh_key" "default" {
    name = "Terraform Example"
    public_key = "${file("id_rsa.pub")}"
}

# setup one small virtual server in Frankfurt.
resource "digitalocean_droplet" "master" {
    image = "centos-7-0-x64"
    name = "master"
    region = "nyc2"
    size = "512mb"

    # install this SSH key on the machine so we can access it later
    ssh_keys = ["c8:df:df:...:d9:41:ce"]

    # ensure that ssh key is available before we setup this machine
    # as in terraform 0.4.2 there is no automatic dependency here (TODO)
    depends_on = [ "digitalocean_ssh_key.default" ]

}
Side note: if you want to put your secret and personal information in a separate file, please see the override configuration of Terraform. This allows you to have a separate file saltmaster_override.tf with all the secret stuff that you can avoid to check in to a repository.
provider "digitalocean" {
    token = "cb93..f552"
}

resource "digitalocean_droplet" "master" {
    ssh_keys = ["c8:df:...:41:ce"]
}
Now run bin\terraform plan on the command line. When everything in your file is spelled correctly, Terraform prints a plan of the steps it will perform to create the described infrastructure for you.
Once you are happy with it, run bin\terraform apply.
You will see the output of Terraform on the console. When you check DigitalOcean’s web console, you’ll see that the first "Droplet" has been created. In your account settings you also see that a SSH key has been registered with your account.
You can see the IP address of the new server in the output of the Terraform command. At any time later you can look up the server DigitalOcean’s web console, or use bin\terraform show to show the state of the currently created resources.
Terraform has created a local file called terraform.tfstate that includes a machine readable description of the previously created resources.
Use terraform show to get a list of all resources that have been created.
If you want to re-create the server, you can use bin\terraform taint <resourcename> and any point.
To issue this for the machine we have just created use bin\terraform taint digitalocean_droplet.master
When you the issue another bin\terraform apply command, the resource will be deleted and re-created.
Perform the following steps to connect to your new newly created machine:
-
Start Putty.
-
In the first screen with the settings enter the IP address of your newly created machine in the cloud.
-
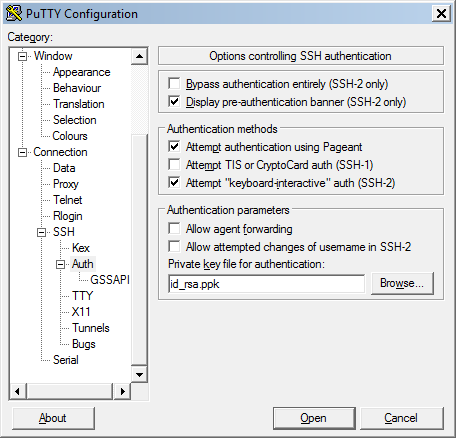
See Login with a private Putty key on where enter your private key. Then click on Open to connect to your machine.
-
Use
rootas the user name when you log in. You should not be asked for a password if everything has been setup correctly.
Congratulations! You have now set up automatically a server in the cloud. And as everything has been scripted, it is totally reproducible. Try out yourself with different combinations of apply, taint and destroy to get yourself familiar with this setup.
3. Setup of Salt
3.1. Startup the salt master in the cloud
Terraform is a great tool to setup servers from scratch. This is why we used it in the previous example. But it has only limited capabilities to install software on the new server and to keep that up-to-date.
We will apply the existing capabilities of Terraform to install a tool that is better suited to do that. This tool will be Salt. Like Terraform Salt takes the configuration of the new machine in a declarative form. Salt competes with Puppet, Chef and Ansible to install and configure software. Salt has been chosen as it support a very declarative syntax to define the state of software and configuration files. It is also known to scale up to many thousands of servers.
First you’ll need to tell Terraform how to connect to the new server. Do this by adding a connection to your Terraform configuration file.
A set of configuration files will be needed on the Salt master, both in /etc/salt (for configuration files) and /srv (for state files describing the to-be state of your upcoming setup). It will also copy the SSH key you’ve created to the cloud as we’ll use it to setup the additional servers.
There is a procedure to boostrap salt on an empty machine that can be run as a single line of code on the command line. A second command runs the provisioning of the master.
resource "digitalocean_droplet" "master" {
...
    connection {
      type = "ssh"
      host = "${digitalocean_droplet.master.ipv4_address}"
      port = 22
      timeout = "5m"
      user = "root"
      key_file = "id_rsa"
    }

    provisioner "local-exec" {
        command = "echo bin\ssh root@${digitalocean_droplet.master.ipv4_address} -i id_rsa > master.bat "
    }

    provisioner "local-exec" {
        command = "echo bin\rsync -vr -e 'ssh -i id_rsa' master/srv root@${digitalocean_droplet.master.ipv4_address}:/ > sync.bat "
    }

    # ensure that SSH Keys are copied to the salt master in the next step
    provisioner "local-exec" {
        command = "if not exist master\srv\salt\cloud\conf (mkdir master\srv\salt\cloud\conf)"
    }
    provisioner "local-exec" {
        command = "copy /y id_rsa* master\srv\salt\cloud\conf"
    }

    # copy copntents of master/srv to the server
    provisioner "file" {
        source = "master/srv"
        destination = "/"
    }


    # copy file with additional provisioning commands to the server
    provisioner "file" {
        source = "complete-bootstrap.sh"
        destination = "/tmp/complete-bootstrap.sh"
    }

    # install salt minion and master
    provisioner "remote-exec" {
        inline = [
            # install salt-minion and salt-master, but don't start services
            "curl -L https://bootstrap.saltstack.com | sh -s -- -M -X -A localhost",
            # work around possible missing executable flag
            "cat /tmp/complete-bootstrap.sh | sh -s"
          ]
    }

...
}
Use the terraform commands taint and apply to recreate your server in the cloud. You’ll now have a running salt master! This will be the command and control server we’ll use in the following steps to setup the full cluster presented in the chapter Introduction.
Besides installing salt on this master server, salt the defined configuration for the master server as the minion.conf contained startup_states: highstate.
Please use SSH to log in to the server and have a look at the files.
A master.bat file has been created automatically with the master’s most recent IP address.
Issue the following command to check if everything worked fine:
# ensure that the minion on the master connected successfully
salt '*' test.ping
# run a highstate command to double-check everything worked
salt '*' state.highstate
3.2. Synchronize a local configuration to your salt master
You can continue editing the files in the local master/srv folder and sync it to the salt master.
Download rsync for windows and unpack it to the bin folder.
Use the sync.bat file to sync any changes you have made to the srv folder to the salt master.
4. Setup of Salt Cloud
Now it’s time to teach Salt how to spin up more servers.
The start of the Salstack configuration is the file top.sls in the folder salt:
base:
  'master':
     - cloud
This should be read as follows: For the base configuration, when on the server master, please make sure that the state defined in salt.cloud is applied, when the state.highstate command is issued. The
The state salt.cloud in this case is the file cloud.sls in the directory salt.
The syntax is that different tokens are delimited with a dot (“.”). The elements at the beginning are directories. The last element can be a directory or a file. If it is a directory, Salt will look up the init.sls file. If it is a file, Salt will look for a file with the token name plus .sls at the end.
# install a package with the same name as the state
salt-cloud:
  pkg.installed

# install a file with the same name as the state
/root/.ssh/id_rsa:
  file.managed:
    - makedirs: True
    - source: salt://cloud/conf/id_rsa
    - mode: 600

/root/.ssh/id_rsa.pub:
  file.managed:
    - makedirs: True
    - source: salt://cloud/conf/id_rsa.pub
    - mode: 600


/etc/salt/cloud.providers.d/digitalocean.conf:
  file.managed:
    - source: salt://cloud/conf/digitalocean.conf
    - template: jinja

/etc/salt/cloud.profiles.d/centos-digitalocean.conf:
  file.managed:
    - source: salt://cloud/conf/centos-digitalocean.conf

# run a command, but only if the file doesn't exist yet
bootstrap:
  cmd.run:
    - name: curl -L https://bootstrap.saltstack.com -o /etc/salt/cloud.deploy.d/bootstrap-salt.sh
    - creates: /etc/salt/cloud.deploy.d/bootstrap-salt.sh
Here are the contents of the files referenced:
my-digitalocean-config:
  provider: digital_ocean
  personal_access_token: {{ salt['pillar.get']('digitalocean:personal_access_token', 'undefined') }}
  ssh_key_file: /root/.ssh/id_rsa
  ssh_key_names: Terraform Example
  location: New York 2
  minion:
    startup_states: highstate
    {% if salt['grains.get']('ip4_interfaces:eth0', None) -%}
    master: {{ grains['ip4_interfaces']['eth0'][0] }}
    {%- endif -%}
    {%- if salt['grains.get']('ip4_interfaces:enp0s8', None) -%}
    master: {{ grains['ip4_interfaces']['enp0s8'][0] }}
{%- endif %}centos-digitalocean:
provider: my-digitalocean-config
image: centos-7-0-x64
size: 512MB
location: New York 2
private_networking: True
deploy: True
backups_enabled: FalseAs Saltstack wil setup some new servers with DigitalOcean for you, it will also need your access token like Terraform did.
Environment specific information is being held in a pillar. Please place it within a file called cloudcredentials.sls within the srv/pillar directory.
digitalocean:
  personal_access_token: cb93...f552
You then reference this file in the top.sls file in the srv/pillar directory.
base:
  'master':
    - cloudcredentials
This configuration ensures, that the secret API key is only available on the master.
The difference between the salt states and the pillars is as follows: the contents of all states are available to all minions of a Salt master. But the contents of the pillars are delivered to the minions on a need-to-know basis. Therefore pillars will contain the secret bits of the configuration: passwords and keys.
You can test this as follows:
# show list of available commands of salt-cloud
salt-cloud -h
# show the setup of providers (reads local configuration only)
# should show my-digitalocean-config with digitalocean
salt-cloud --list-providers
# show the setup of profiles with digitalocean (ready local configuration only)
# should show centos-digitalocean with my-digitalocean-config
salt-cloud --list-profiles=my-digitalocean-config
# show available locations for provider digitalocean
salt-cloud --list-locations=my-digitalocean-config
# show a list of instances in the cloud (accesses the cloud and uses the key, should be empty now)
salt-cloud -Q
5. Create the webservers
Now we have our Salt master running in the cloud as a command and control server. Using this as a stepping stone, we’ll spin up some web servers.
5.1. Start new nodes using Salt
Now you can tell Salt to spin up new servers. This is done using the command
salt-cloud -l debug -p centos-digitalocean web1
You will see that Salt talks to the DigitalOcean API and creates a VM like Terraform has done before. The benefit is, that the new VM (a "minion") is controlled by our master server.
Use the command salt-key you’ll see all minions that are registered with our master.
Using salt '*' test.ping the master shows all servers that are reachable.
With salt-cloud -Q you’ll see up-to-date information about the currently running servers running in the cloud.
5.2. Install software on newly created nodes
Now we’ll define a state to describe what a web server should do. As a very simple example it will contain an Apache httpd web server and a simple HTML page that is being served. It will contain a little bit of dynamic content so that we’ll know which server create the page once we have the load balancer in place.
Create a file web/init.sls with the following content:
# install the web server package
httpd:
  pkg.installed:
    - name: httpd
  service.running:
    - enable: true

/var/www/html/index.html:
  file.managed:
    - template: jinja
    - source: salt://web/conf/index.html
/var/www/html/index.json:
  file.managed:
    - template: jinja
    - source: salt://web/conf/index.json
This file will be evaluated on each web server using salt, and then saved as a static file in the httpd’s folder. It will contain the public IP address of the server that is being retrieved from the Salt’s context.
<html>
    <body>
        <p>Hello world!</p>
        <p>This is

            {% if salt['grains.get']('ip4_interfaces:eth0', None) %}
            {{ grains['ip4_interfaces']['eth0'][0] }}
            {% endif %}

            {% if salt['grains.get']('ip4_interfaces:enp0s8', None) %}
            {{ grains['ip4_interfaces']['enp0s8'][0] }}
            {% endif %}

            talking!</p>
    </body>
</html>
Now tell Salt to run this state on all servers called web* that we will fire up in a second.
base:
  ...
  'web*':
     - web
To run this state on the the server start the command
salt '*' state.highstate
This will trigger all states on all registered servers. This will install the web server packages on the newly created server web1.
Now point your browser to the IP address of your server in your browser. You’ll now see the web page that we have deployed to the server.
Let’s install another server with just two more commands:
salt-cloud -l debug -p centos-digitalocean web2
As in the digitalocean.conf file contains the setting startup_states: highstate, the new server will be installed with the latest configuration settings on startup.
6. Setup monitoring using Consul
6.1. Basic setup of Consul
Consul will do the monitoring and service discovery in our setup. It will know about all the web services that we have running, and monitors that they work properly.
Consul consists of servers and agents. They differ only by configuration. In this setup there will be one server located on the salt master. In a production setup you’ll want to have a high available cluster.
Again we start with the top.sls configuration to register the new state. This time for all of our servers.
base:
  ...
  '*':
     - tools
- consul{% set consul_version = '0.6.3' %}
/usr/share/consul_{{ consul_version }}:
archive.extracted:
- source: https://releases.hashicorp.com/consul/{{ consul_version }}/consul_{{ consul_version }}_linux_amd64.zip
- source_hash: sha256=b0532c61fec4a4f6d130c893fd8954ec007a6ad93effbe283a39224ed237e250
- archive_format: zip
- if_missing: /usr/share/consul_{{ consul_version }}/consul
/usr/share/consul_web_ui_{{ consul_version }}:
archive.extracted:
- source: https://releases.hashicorp.com/consul/{{ consul_version }}/consul_{{ consul_version }}_web_ui.zip
- source_hash: sha256=93bbb300cacfe8de90fb3bd5ede7d37ae6ce014898edc520b9c96a676b2bbb72
- archive_format: zip
- if_missing: /usr/share/consul_web_ui_{{ consul_version }}/index.html
/usr/bin/consul:
file.managed:
- source: /usr/share/consul_{{ consul_version }}/consul
- mode: 755
- watch_in:
- service: consul
/etc/sysconfig/consul:
file.managed:
- source: salt://consul/conf/sysconfig-consul
- watch_in:
- service: consul
/etc/consul:
file.directory
/var/lib/consul:
file.directory:
- user: consul
- group: consul
- recurse:
- user
- group
- require:
- group: consul
- user: consul
/etc/consul/consul.json:
file.managed:
- source: salt://consul/conf/consul.json
- watch_in:
- service: consul
/usr/lib/systemd/system/consul.service:
file.managed:
- source: salt://consul/conf/consul.service
- watch_in:
- service: consul
/etc/consul/consul-ui-service.json:
file.managed:
- source: salt://consul/conf/consul-ui-service.json
- watch_in:
- service: consul
/etc/consul/consul-ui.json:
file.managed:
- source: salt://consul/conf/consul-ui.json
- template: jinja
- defaults:
consul_version: {{ consul_version }}
- watch_in:
- service: consul
/etc/consul/common.json:
file.managed:
- template: jinja
- source: salt://consul/conf/common.json
- watch_in:
- service: consul
consul:
group.present: []
user.present:
- groups:
- consul
service.running:
- enable: True
# don't use reload here as not all configuration elements can be reloaded
# and a non-working configuration will not be reloaded
# - reload: True{
{% if salt['grains.get']('ip4_interfaces:eth0', None) %}
"bind_addr": "{{ grains['ip4_interfaces']['eth0'][0] }}",
{% endif %}
{% if salt['grains.get']('ip4_interfaces:enp0s8', None) %}
"bind_addr": "{{ grains['ip4_interfaces']['enp0s8'][0] }}",
{% endif %}
{% if salt['grains.get']('host', None) == 'master' %}
"client_addr": "0.0.0.0",
"bootstrap": true,
"server": true,
{% else %}
"start_join": [ "{{ grains['master'] }}" ],
{% endif %}
"rejoin_after_leave": true
}To show how to add monitoring consul will monitor its own web console using this service plus check.
{

  "service": {"name": "consul-ui", "tags": ["consul"], "port": 8500},

  "check": {
    "id": "api",
    "name": "HTTP API on port 8500",
    "http": "http://localhost:8500",
    "service_id": "consul-ui",
    "interval": "10s",
    "timeout": "1s"
  }

}
Apply this configuration to you configuration by running:
salt '*' state.highstate
Salt will show you the applied settings. You can now look at consul’s console using a web browser and the salt master’s IP: http://<master>:8500/.

6.2. Add monitoring for the web server
As part of our web configuration please install an additional file httpd.json that will contain the service plus monitoring instructions.
/etc/consul/httpd.json:
  file.managed:
    - template: jinja
    - source: salt://web/conf/httpd.json
    - watch_in:
      - service: consul
And here the file:
{
  "service": {
    "name": "web",
    {# fabio (as of 1.0.8) needs an address for each service #}
    {# watch https://github.com/eBay/fabio/pull/49 if this changes #}
    {% if salt['grains.get']('ip4_interfaces:eth0', None) %}
    "address": "{{ grains['ip4_interfaces']['eth0'][0] }}",
    {% endif %}
    {% if salt['grains.get']('ip4_interfaces:enp0s8', None) %}
    "address": "{{ grains['ip4_interfaces']['enp0s8'][0] }}",
    {% endif %}
    {# fabio needs urlprefix- tag to configure its routing #}
    "tags": ["web", "urlprefix-/"],
    "port": 80
  },

  "check": {
    "id": "api",
    "name": "HTTP API on port 80",
    "http": "http://localhost:80",
    "service_id": "web",
    "interval": "10s",
    "timeout": "1s"
  }

}
As soon as you deploy this configuration using Salt, you’ll see that this service appears in the Consul UI.
salt '*' state.highstate
Congratulations! You now have monitoring up and running. And Consul knows about all the hosts that are running you web service.
6.3. Using Consul for DNS resolving
You can use dnsmasq to forward all DNS inquiries ending with .consul to consul.
The state dnsmasq/init.sls will setup NetworkManager to use dnsmasq, and will setup dnsmasq to forward all requests to Consul.
base:
  ...
- dnsmasqdnsmasq:
pkg.installed:
- name: dnsmasq
service.dead:
- enable: False
/etc/NetworkManager/conf.d/10-dnsmasq.conf:
file.managed:
- source: salt://dnsmasq/conf/networkmanager-dnsmasq.conf
/etc/NetworkManager/dnsmasq.d/consul.conf:
file.managed:
- source: salt://dnsmasq/conf/dnsmasq-consul.conf
NetworkManager:
service.running:
- reload: False
- watch:
- file: /etc/NetworkManager/conf.d/10-dnsmasq.conf
- file: /etc/NetworkManager/dnsmasq.d/consul.conf[main]
dns=dnsmasqserver=/consul/127.0.0.1#8600After you’ve run this successfully, the following lookup will work:
$ nslookup web.service.consul
Server:         127.0.0.1
Address:        127.0.0.1#53

Name:   web.service.consul
Address: 192.168.23.21
Name:   web.service.consul
Address: 192.168.23.22
Name:   web.service.consul
Address: 192.168.23.23
7. Creating the load balancer
7.1. Install consul-template
For our load balancer will need a configuration file that is written dynamically with the latest information available for our web nodes. This job is done by consul-template.
This consists of a go binary, a configuration file for systemd and a configuration file for consul-template itself.
To install this, there is the following state:
base:
  ...
  'lb*':
- consul-template{% set consul_template_version = '0.12.2' %}
/usr/lib/systemd/system/consul-template.service:
file.managed:
- source: salt://consul-template/conf/consul-template.service
/etc/consul-template:
file.recurse:
- source: salt://consul-template/templates
- makedirs: True
/usr/share/consul-template_{{ consul_template_version }}:
archive.extracted:
- source: https://releases.hashicorp.com/consul-template/{{ consul_template_version }}/consul-template_{{ consul_template_version }}_linux_amd64.zip
- source_hash: sha256=a8780f365bf5bfad47272e4682636084a7475ce74b336cdca87c48a06dd8a193
- archive_format: zip
- if_missing: /usr/share/consul-template_{{ consul_template_version }}/consul-template
/usr/bin/consul-template:
file.managed:
- source: /usr/share/consul-template_{{ consul_template_version }}/consul-template
- mode: 755
service.running:
- enable: True
- name: consul-template
- watch:
- file: /usr/bin/consul-template
- file: /etc/consul-template
- file: /usr/lib/systemd/system/consul-template.service
- require:
- file: /usr/bin/consul-template
- file: /etc/consul-template
- file: /usr/lib/systemd/system/consul-template.serviceTogether with its configuration files:
[Unit]
Description=Consul Template is a tool to keep configuration files up to date
Documentation=https://github.com/hashicorp/consul-template
After=consul.service
Wants=consul.service

[Service]
User=root
Group=root
ExecStart=/usr/bin/consul-template -config=/etc/consul-template
KillSignal=SIGINT

[Install]
WantedBy=multi-user.targetconsul = "127.0.0.1:8500"
retry = "10s"
max_stale = "10m"
log_level = "info"
syslog {
enabled = true
facility = "LOCAL5"
}Now you can start the new load balancer node and provision it with these two commands:
salt-cloud -l debug -p centos-digitalocean lb1
Use the following command to have a look where this service is running:
salt '*' service.status consul-template
In the next step we’ll use this service to keep the configuration file of our load balancer up-to-date.
7.2. Install nginx
Now we have multiple web servers running. Now we need to place a load balancer in front of them. The software we can use as a load balancer is nginx (pronounced "engine-X").
The installation is straight-forward like installing a web server. First create a state:
# install the web server package along with its configuration file
nginx:
  pkg.installed:
    - name: nginx
  file.managed:
    - name: /etc/nginx/nginx.conf
    - source: salt://lb/conf/nginx.conf
    - require:
      - pkg: nginx
    - watch_in:
      - service: nginx
  service.running:
    - enable: true
    - require:
      - file: /etc/consul-template/nginx-consul.conf
      - service: consul-template
      - service: consul

# configure consul-template to keep a file up-to-date with all upstream servers
/etc/consul-template/nginx-consul.conf:
  file.managed:
    - source: salt://lb/conf/nginx-consul.conf
    - watch_in:
      - service: consul-template
    - require:
      - file: nginx
      - file: /etc/nginx/conf.d/upstream.ctmpl

# this is the template file for the upstream servers
/etc/nginx/conf.d/upstream.ctmpl:
  file.managed:
    - source: salt://lb/conf/upstream.ctmpl
    - require:
      - pkg: nginx
    - watch_in:
      - service: consul-template

# add monitoring for nginx in consul
/etc/consul/nginx.json:
  file.managed:
    - source: salt://lb/conf/nginx.json
    - watch_in:
      - service: consul
With the following referenced files:
# For more information on configuration, see:
#   * Official English Documentation: http://nginx.org/en/docs/
#   * Official Russian Documentation: http://nginx.org/ru/docs/

user  nginx;
worker_processes  1;

error_log  /var/log/nginx/error.log;
#error_log  /var/log/nginx/error.log  notice;
#error_log  /var/log/nginx/error.log  info;

pid        /run/nginx.pid;


events {
    worker_connections  1024;
}


http {
    include       /etc/nginx/mime.types;
    default_type  application/octet-stream;

    log_format  main  '$remote_addr - $remote_user [$time_local] "$request" '
                      '$status $body_bytes_sent "$http_referer" '
                      '"$http_user_agent" "$http_x_forwarded_for"';

    access_log  /var/log/nginx/access.log  main;

    sendfile        on;
    #tcp_nopush     on;

    #keepalive_timeout  0;
    keepalive_timeout  65;

    #gzip  on;

    index   index.html index.htm;

    # Load modular configuration files from the /etc/nginx/conf.d directory.
    # See http://nginx.org/en/docs/ngx_core_module.html#include
    # for more information.
    include /etc/nginx/conf.d/*.conf;

    server {
        listen       9090 default_server;
        server_name  localhost;
        root         /usr/share/nginx/html;

        #access_log  /var/log/nginx/host.access.log  main;

        # Load configuration files for the default server block.
        include /etc/nginx/default.d/*.conf;

        location / {
            proxy_pass http://web;
        }

        # redirect server error pages to the static page /40x.html
        #
        error_page  404              /404.html;
        location = /404.html {
        }

        # redirect server error pages to the static page /50x.html
        #
        error_page   500 502 503 504  /50x.html;
        location = /50x.html {
        }
    }
}{
"service": {"name": "lb", "tags": ["web"], "port": 9090},
"check": {
"id": "api",
"name": "HTTP API on port 9090",
"http": "http://localhost:9090",
"service_id": "lb",
"interval": "10s",
"timeout": "1s"
}
}template {
source = "/etc/nginx/conf.d/upstream.ctmpl"
destination = "/etc/nginx/conf.d/upstream.conf"
# adding "true" to allow keep consul-template running
# even if nginx restart fails
command = "service nginx restart || true"
}upstream web {
{{range service "web"}}
server {{.Address}}:{{.Port}};
{{end}}
}template {
source = "/etc/nginx/conf.d/upstream.ctmpl"
destination = "/etc/nginx/conf.d/upstream.conf"
# adding "true" to allow keep consul-template running
# even if nginx restart fails
command = "service nginx restart || true"
}Then associate this state with a load balancer node:
base:
  ...
  'lb*':
     - lb
Publish this configuration to your nodes:
salt '*' state.highstate
Point your browser to http://<LB-IPADDRESS>:9090/ to see the website loadbalancing over multiple servers.
Every time you reload your browser, nginx will direct the request to a different server and you’ll
see a different server’s IP address.
8. Cleanup tutorial
8.1. Shutdown nodes created by Salt Cloud
Log in to the salt master.
Issue the following commands:
# query cloud nodes
salt-cloud -Q
# delete nodes
salt-cloud -d web1 web2 web3 web4 web5 lb1
Then log off from the master.
8.2. Destroy node created with Terraform
Issue the following command:
terraform destroy
8.3. Double Check Digital Ocean Console
Log in on the web console of DigitalOcean and check if all nodes have been destroyed.
If not, destroy them manually (as they would otherwise waste money)
Appendix A: License
Copyright 2015 Alexander Schwartz
Licensed under the Apache License, Version 2.0 (the "License"); you may not use this file except in compliance with the License. You may obtain a copy of the License at
Unless required by applicable law or agreed to in writing, software distributed under the License is distributed on an "AS IS" BASIS, WITHOUT WARRANTIES OR CONDITIONS OF ANY KIND, either express or implied. See the License for the specific language governing permissions and limitations under the License.