Authentication flows
An authentication flow is a container of authentications, screens, and actions, during log in, registration, and other Keycloak workflows. To view all the flows, actions, and checks, each flow requires:
Built-in flows
Keycloak has several built-in flows. You cannot modify these flows, but you can alter the flow’s requirements to suit your needs.
-
Click Authentication in the menu.
-
Click on the Browser item in the list to see the details.
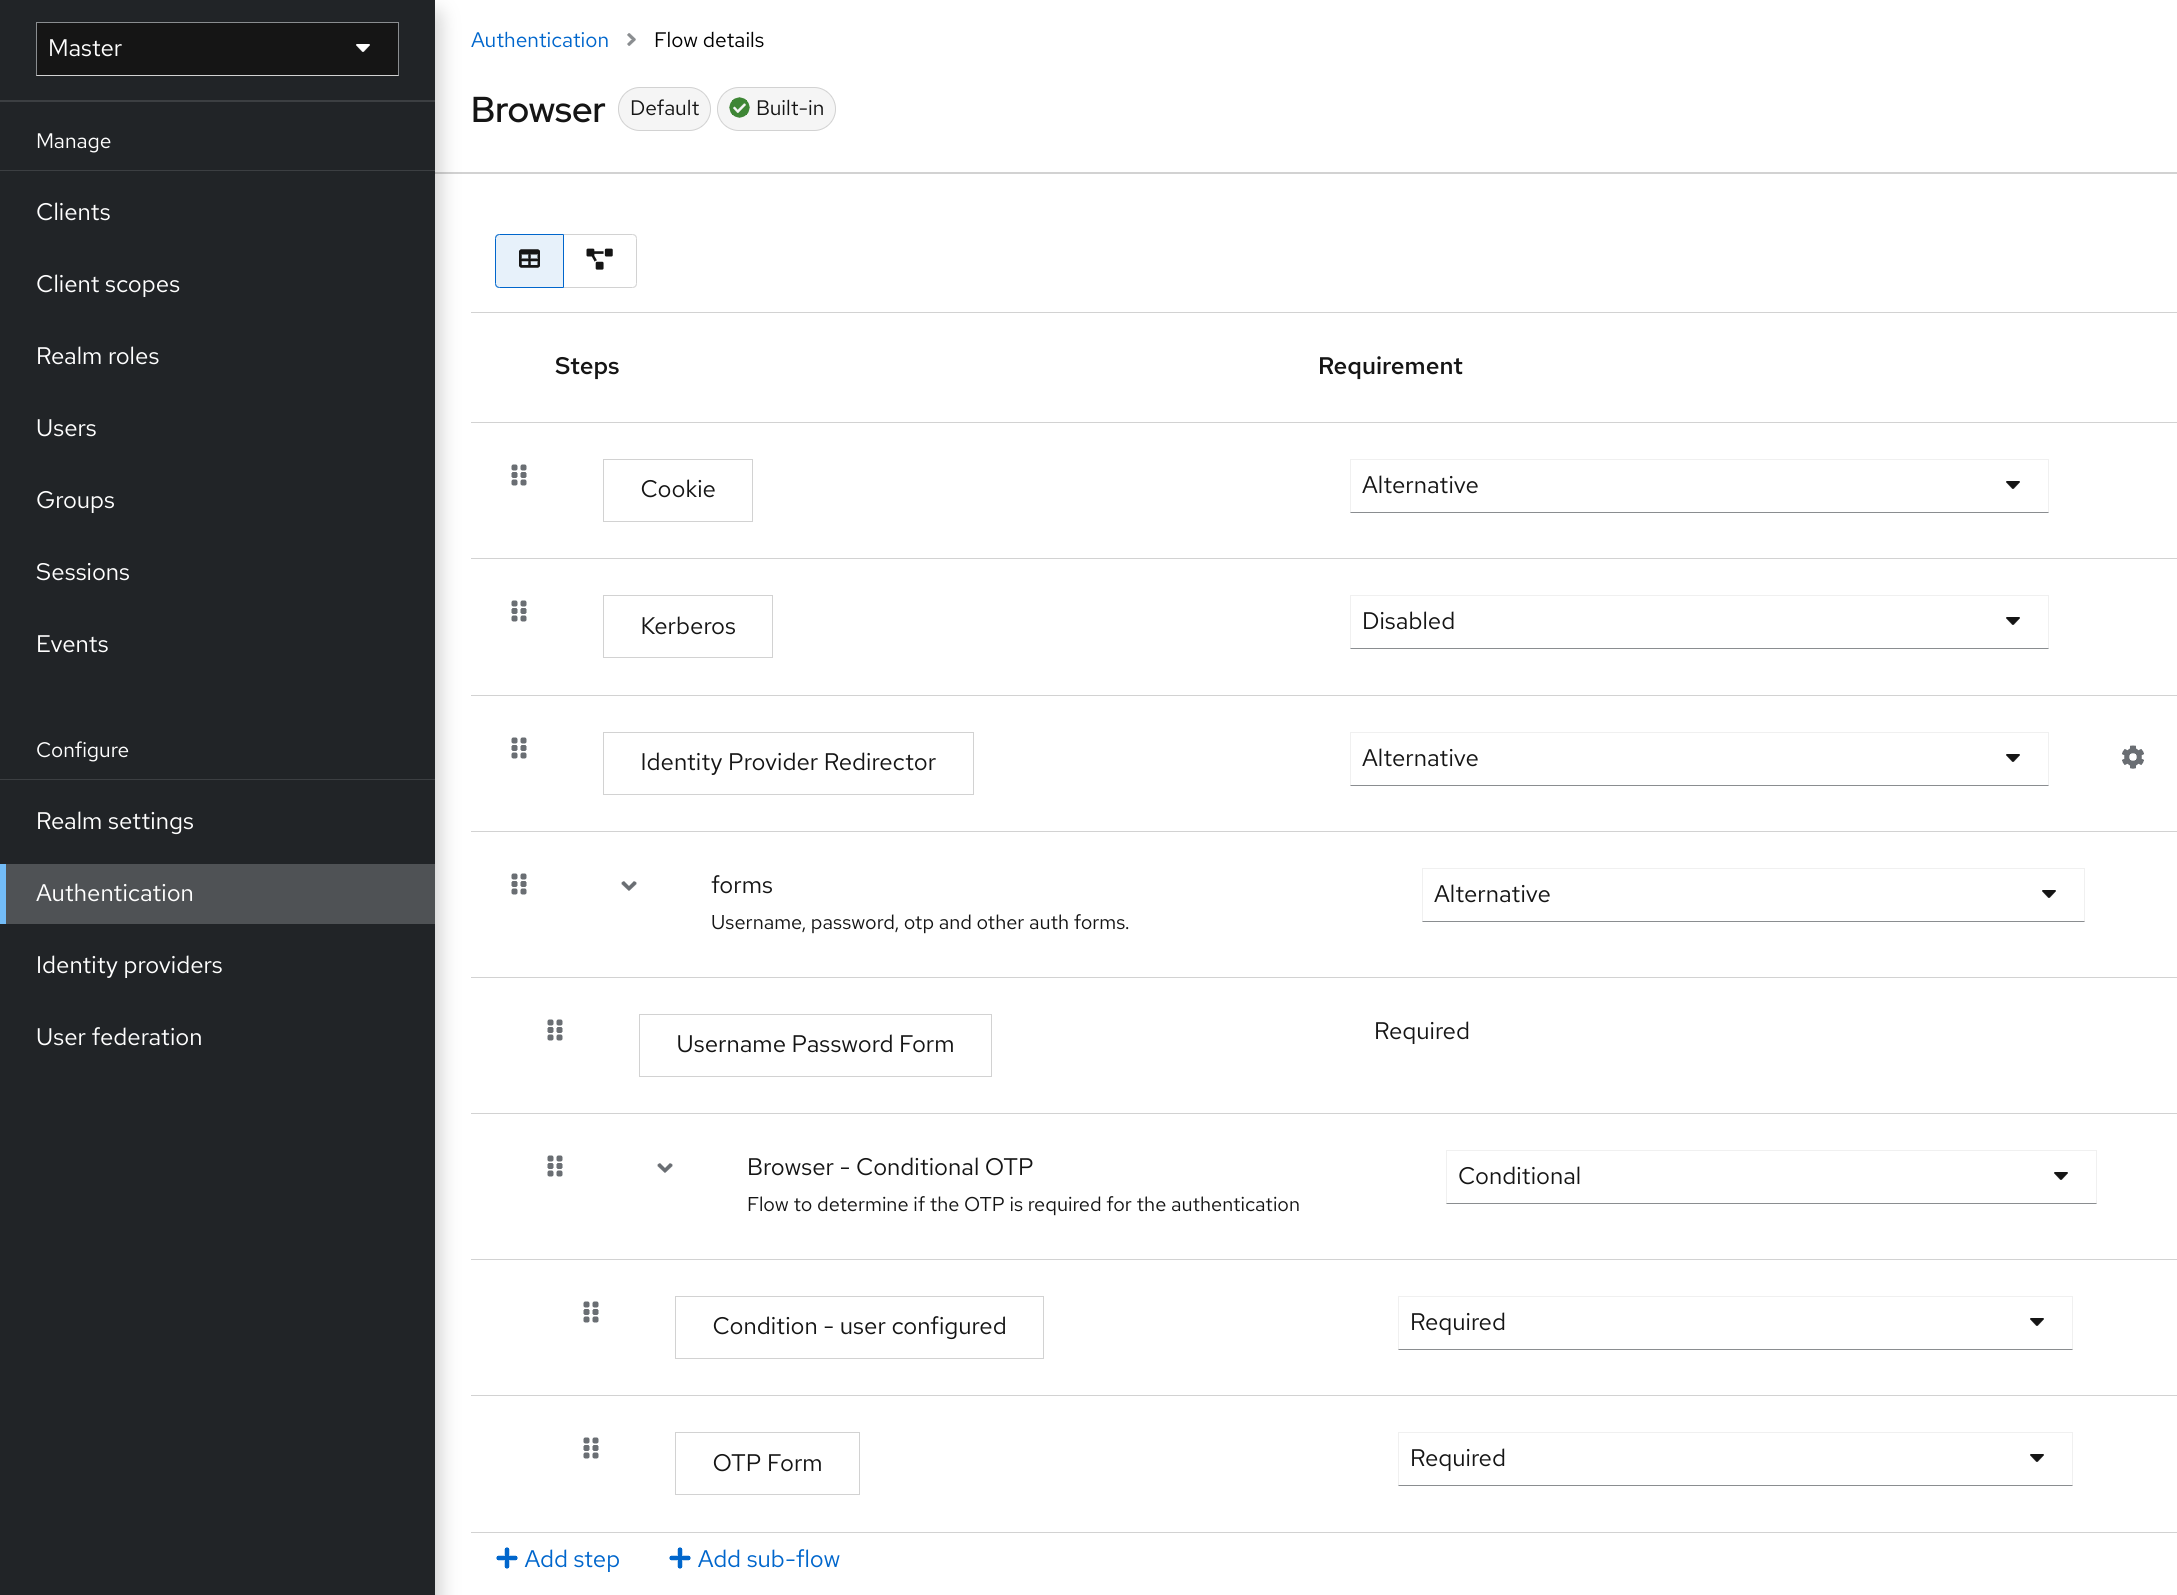
Two sections exist.
Auth type
The name of the authentication or the action to execute. If an authentication is indented, it is in a sub-flow. It may or may not be executed, depending on the behavior of its parent.
-
Cookie
The first time a user logs in successfully, Keycloak sets a session cookie. If the cookie is already set, this authentication type is successful. Since the cookie provider returned success and each execution at this level of the flow is alternative, Keycloak does not perform any other execution. This results in a successful login.
-
Kerberos
This authenticator is disabled by default and is skipped during the Browser Flow.
-
Identity Provider Redirector
This action is configured through the Actions > Config link. It redirects to another IdP for identity brokering.
-
Forms
Since this sub-flow is marked as alternative, it will not be executed if the Cookie authentication type passed. This sub-flow contains an additional authentication type that needs to be executed. Keycloak loads the executions for this sub-flow and processes them.
The first execution is the Username Password Form, an authentication type that renders the username and password page. It is marked as required, so the user must enter a valid username and password.
The second execution is the Browser - Conditional OTP sub-flow. This sub-flow is conditional and executes depending on the result of the Condition - User Configured execution. If the result is true, Keycloak loads the executions for this sub-flow and processes them.
The next execution is the Condition - User Configured authentication. This authentication checks if Keycloak has configured other executions in the flow for the user. The Browser - Conditional OTP sub-flow executes only when the user has a configured OTP credential.
The final execution is the OTP Form. Keycloak marks this execution as required but it runs only when the user has an OTP credential set up because of the setup in the conditional sub-flow. If not, the user does not see an OTP form.
Requirement
A set of radio buttons that control the execution of an action executes.
Required
All Required elements in the flow must be successfully sequentially executed. The flow terminates if a required element fails.
Alternative
Only a single element must successfully execute for the flow to evaluate as successful. Because the Required flow elements are sufficient to mark a flow as successful, any Alternative flow element within a flow containing Required flow elements will not execute.
Conditional
This requirement type is only set on sub-flows.
-
A Conditional sub-flow contains executions. These executions must evaluate to logical statements.
-
If all executions evaluate as true, the Conditional sub-flow acts as Required.
-
If all executions evaluate as false, the Conditional sub-flow acts as Disabled.
-
If you do not set an execution, the Conditional sub-flow acts as Disabled.
-
If a flow contains executions and the flow is not set to Conditional, Keycloak does not evaluate the executions, and the executions are considered functionally Disabled.
Creating flows
Important functionality and security considerations apply when you design a flow.
To create a flow, perform the following:
-
Click Authentication in the menu.
-
Click Create flow.
|
You can copy and then modify an existing flow. Click the "Action list" (the three dots at the end of the row), click Duplicate, and enter a name for the new flow. |
When creating a new flow, you must create a top-level flow first with the following options:
- Alias
-
The name of the flow.
- Description
-
The description you can set to the flow.
- Top-Level Flow Type
-
The type of flow. The type client is used only for the authentication of clients (applications). For all other cases, choose generic.
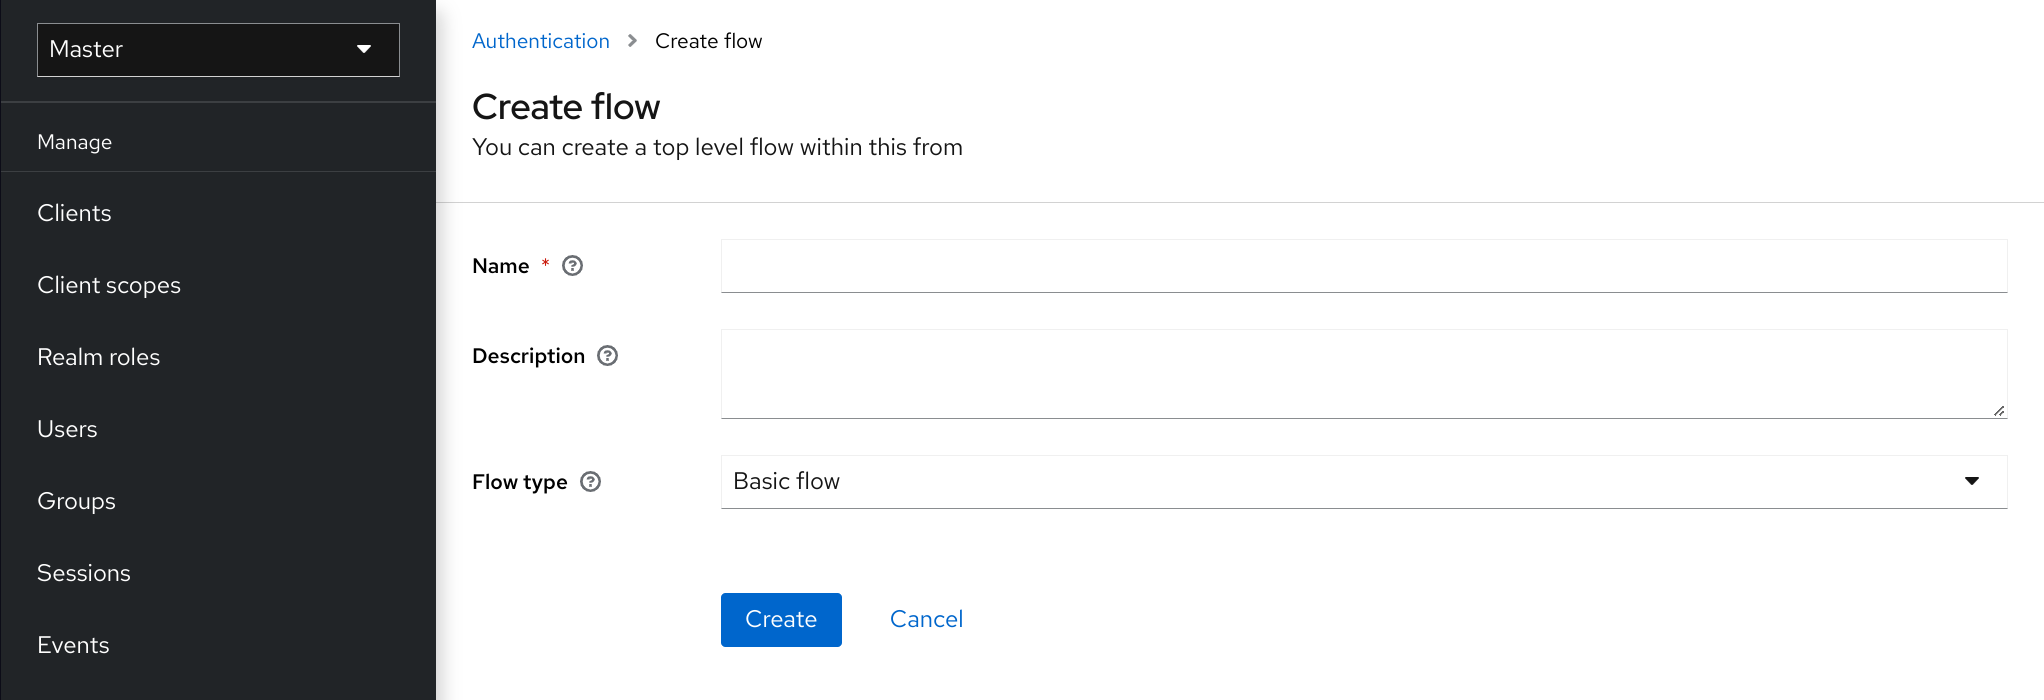
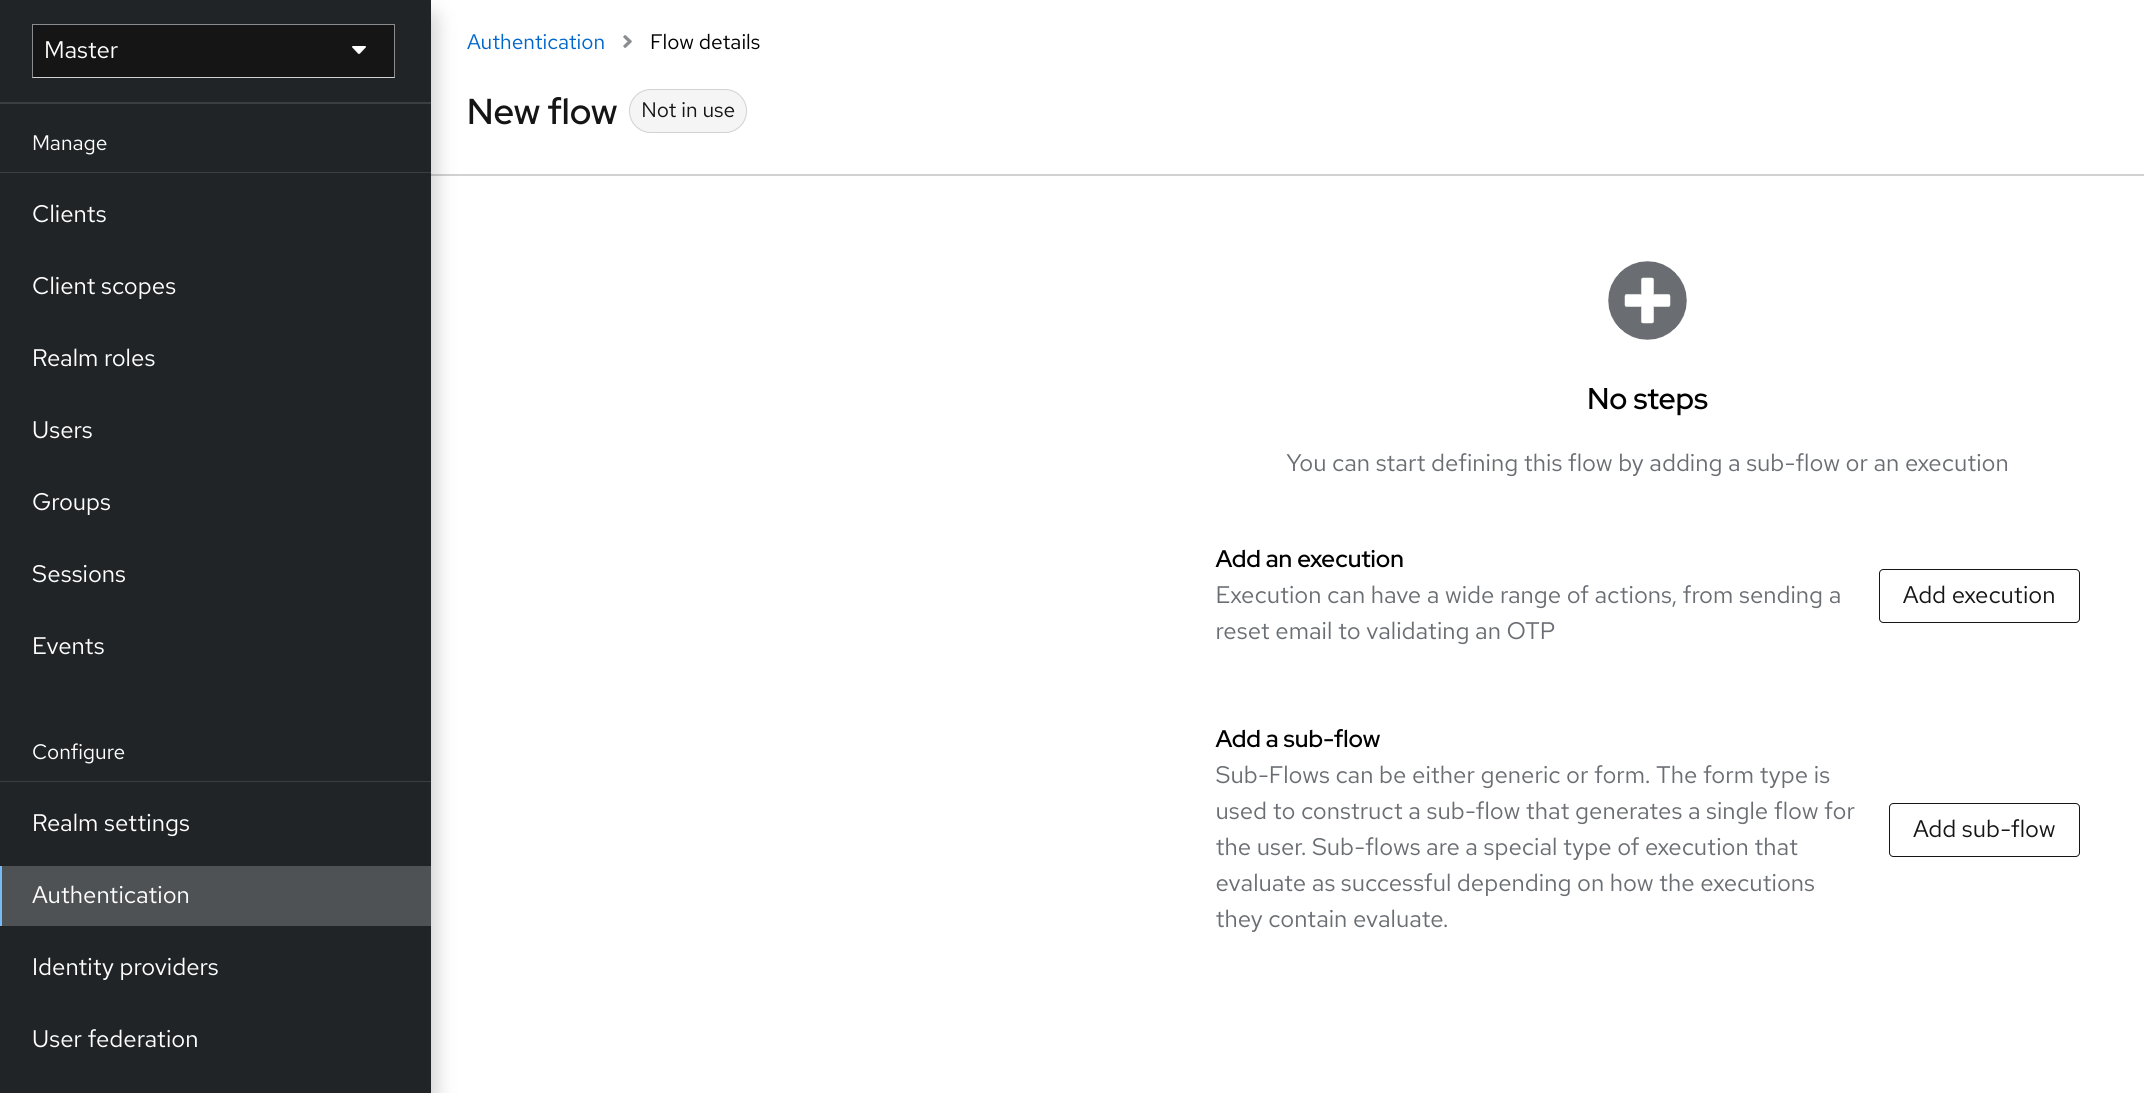
When Keycloak has created the flow, Keycloak displays the Add step, and Add flow buttons.
Three factors determine the behavior of flows and sub-flows.
-
The structure of the flow and sub-flows.
-
The executions within the flows
-
The requirements set within the sub-flows and the executions.
Executions have a wide variety of actions, from sending a reset email to validating an OTP. Add executions with the Add step button. Hover over the question mark next to Provider, to see a description of the execution.

Two types of executions exist, automatic executions and interactive executions. Automatic executions are similar to the Cookie execution and will automatically perform their action in the flow. Interactive executions halt the flow to get input. Executions executing successfully set their status to success. For a flow to complete, it needs at least one execution with a status of success.
You can add sub-flows to top-level flows with the Add flow button. The Add flow button displays the Create Execution Flow page. This page is similar to the Create Top Level Form page. The difference is that the Flow Type can be generic (default) or form. The form type constructs a sub-flow that generates a form for the user, similar to the built-in Registration flow. Sub-flows success depends on how their executions evaluate, including their contained sub-flows. See the execution requirements section for an in-depth explanation of how sub-flows work.
|
After adding an execution, check the requirement has the correct value. |
All elements in a flow have a Delete option in the Actions menu. This action removes the element from the flow. Executions have a ⚙️ menu item (the gear icon) to configure the execution. It is also possible to add executions and sub-flows to sub-flows with the Add step and Add flow links.
Since the order of execution is important, you can move executions and sub-flows up and down by dragging their names.
|
Make sure to properly test your configuration when you configure the authentication flow to confirm that no security holes exist in your setup. We recommend that you test various corner cases. For example, consider testing the authentication behavior for a user when you remove various credentials from the user’s account before authentication. As an example, when 2nd-factor authenticators, such as OTP Form or WebAuthn Authenticator, are configured in the flow as REQUIRED and the user does not have credential of particular type, the user will be able to setup the particular credential during authentication itself. This situation means that the user does not authenticate with this credential as he setup it right during the authentication. So for browser authentication, make sure to configure your authentication flow with some 1st-factor credentials such as Password or WebAuthn Passwordless Authenticator. |
Creating a password-less browser login flow
To illustrate the creation of flows, this section describes creating an advanced browser login flow. The purpose of this flow is to allow a user a choice between logging in using a password-less manner with WebAuthn, or two-factor authentication with a password and OTP.
-
Click Authentication in the menu.
-
Click the Flows tab.
-
Click Create flow.
-
Enter
Browser Password-lessas a name. -
Click Create.
-
Click Add execution.
-
Select Cookie from the list.
-
Click Add.
-
Select Alternative for the Cookie authentication type to set its requirement to alternative.
-
Click Add step.
-
Select Kerberos from the list.
-
Click Add.
-
Click Add step.
-
Select Identity Provider Redirector from the list.
-
Click Add.
-
Select Alternative for the Identity Provider Redirector authentication type to set its requirement to alternative.
-
Click Add sub-flow.
-
Enter Forms as a name.
-
Click Add.
-
Select Alternative for the Forms authentication type to set its requirement to alternative.
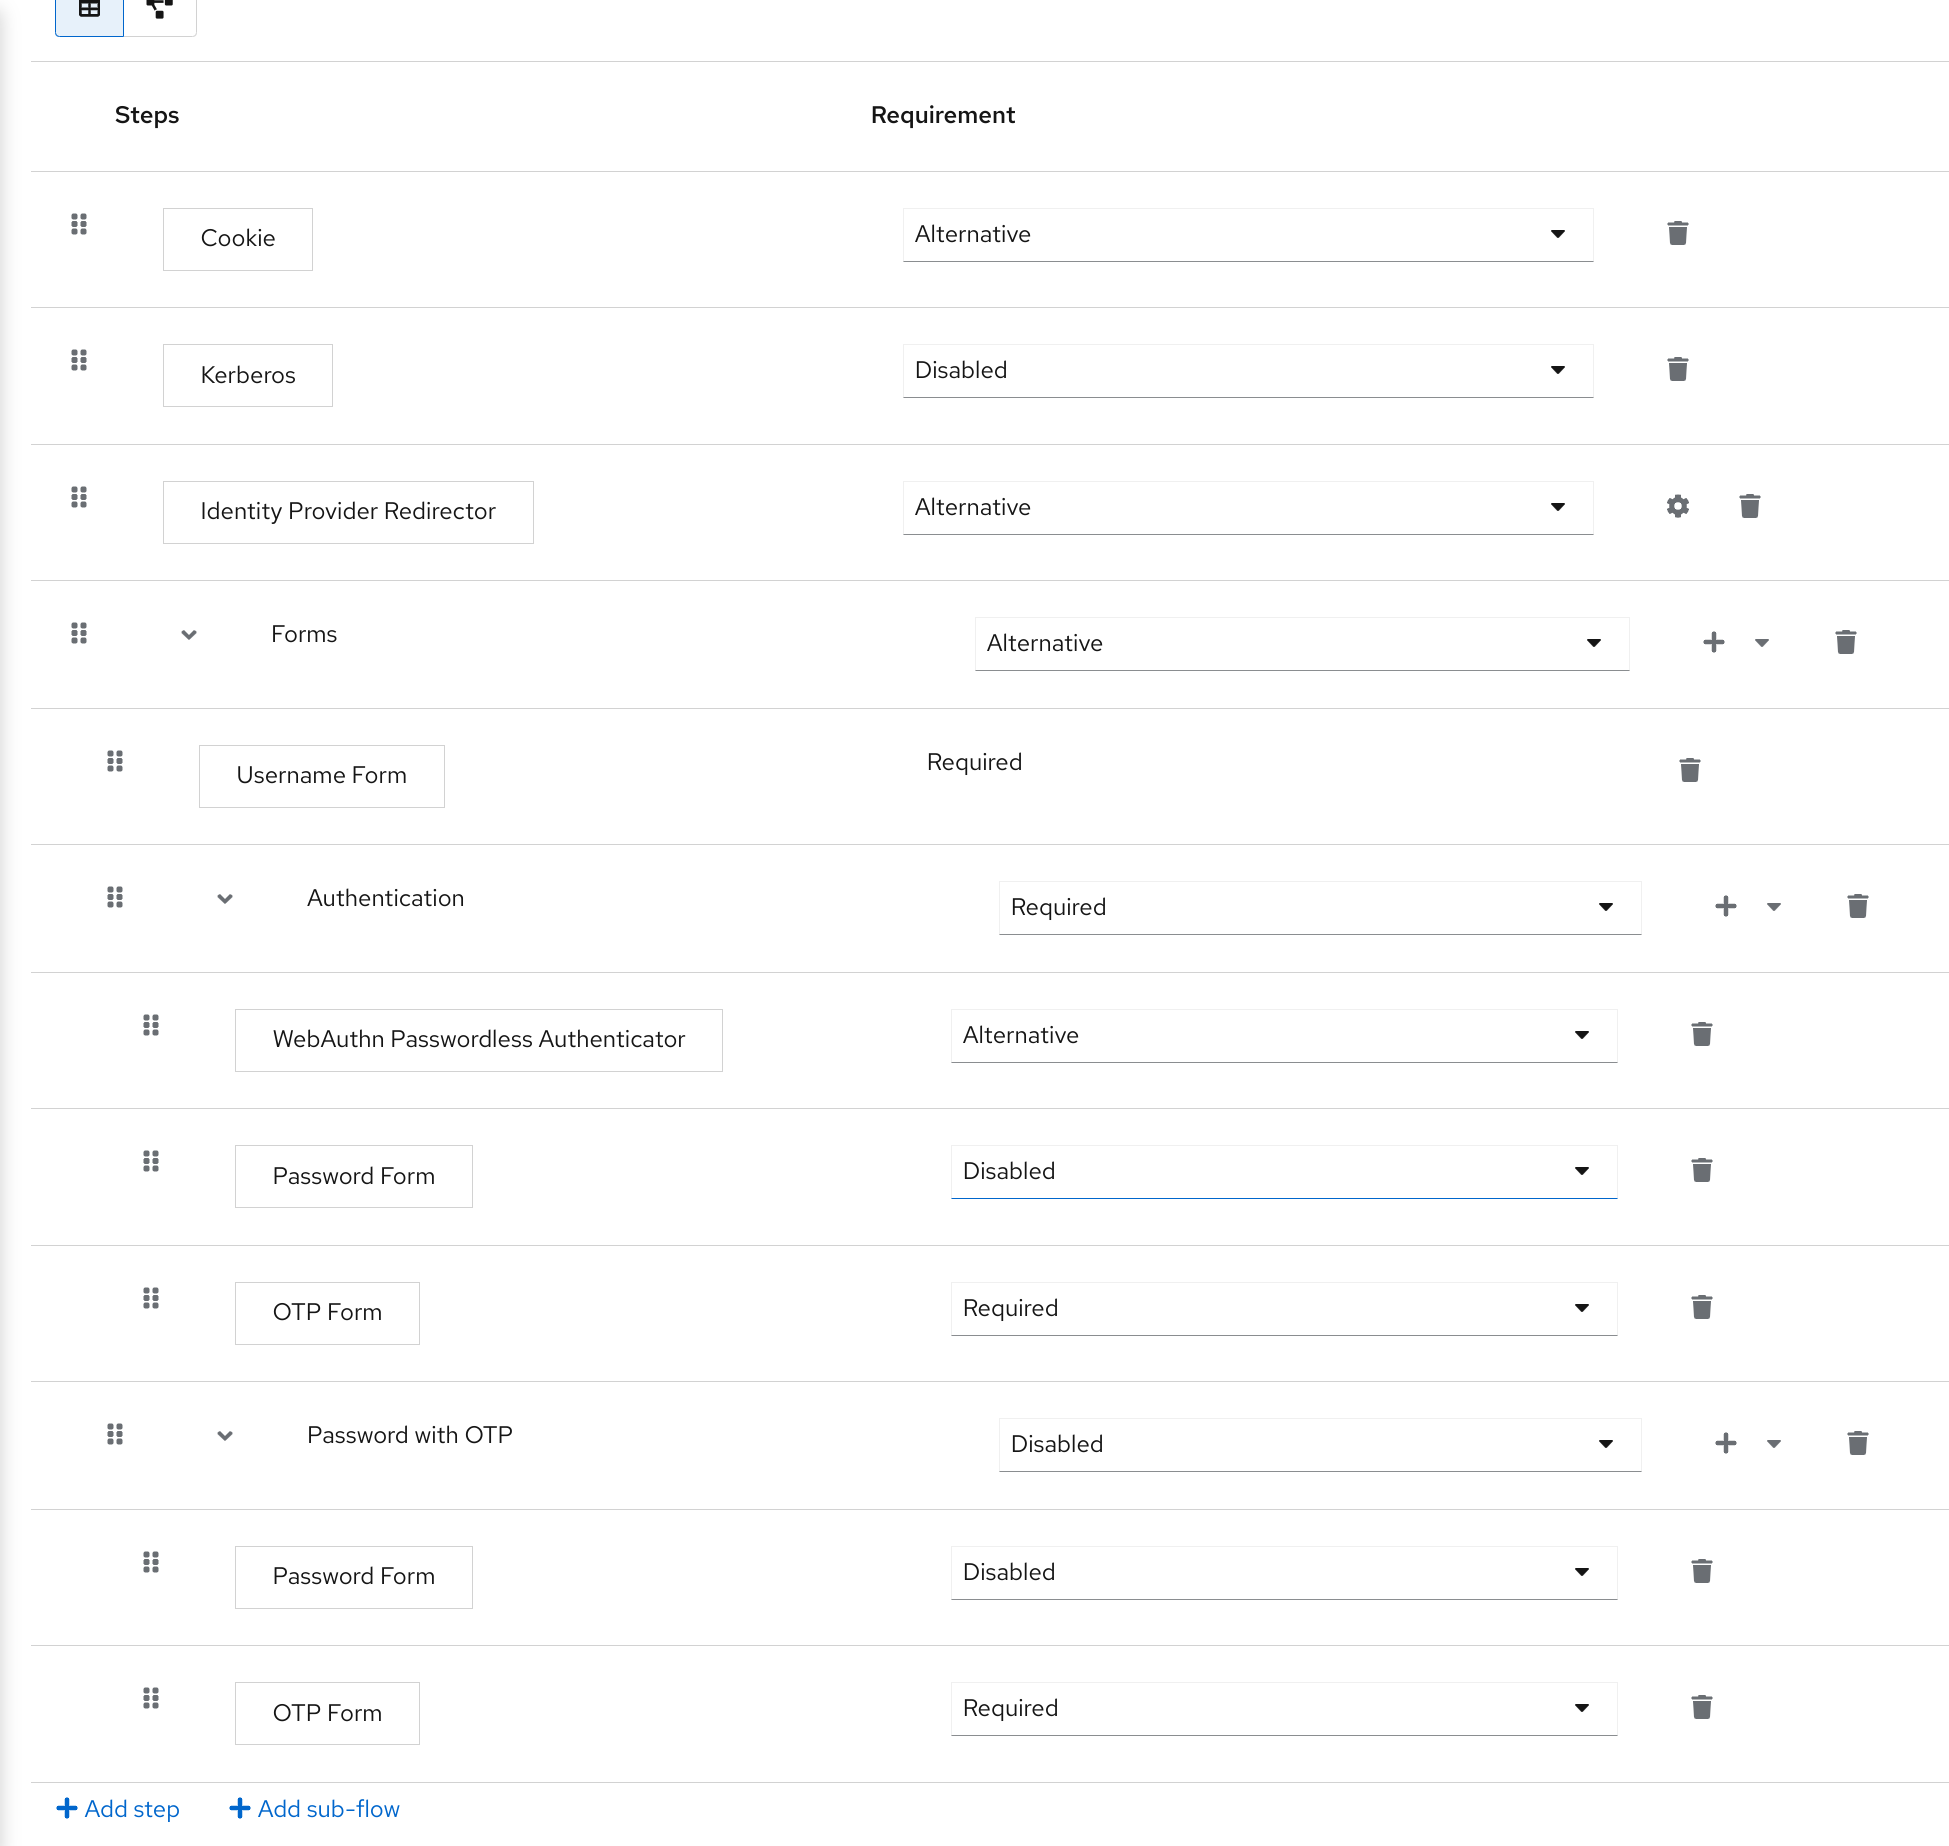
The common part with the browser flow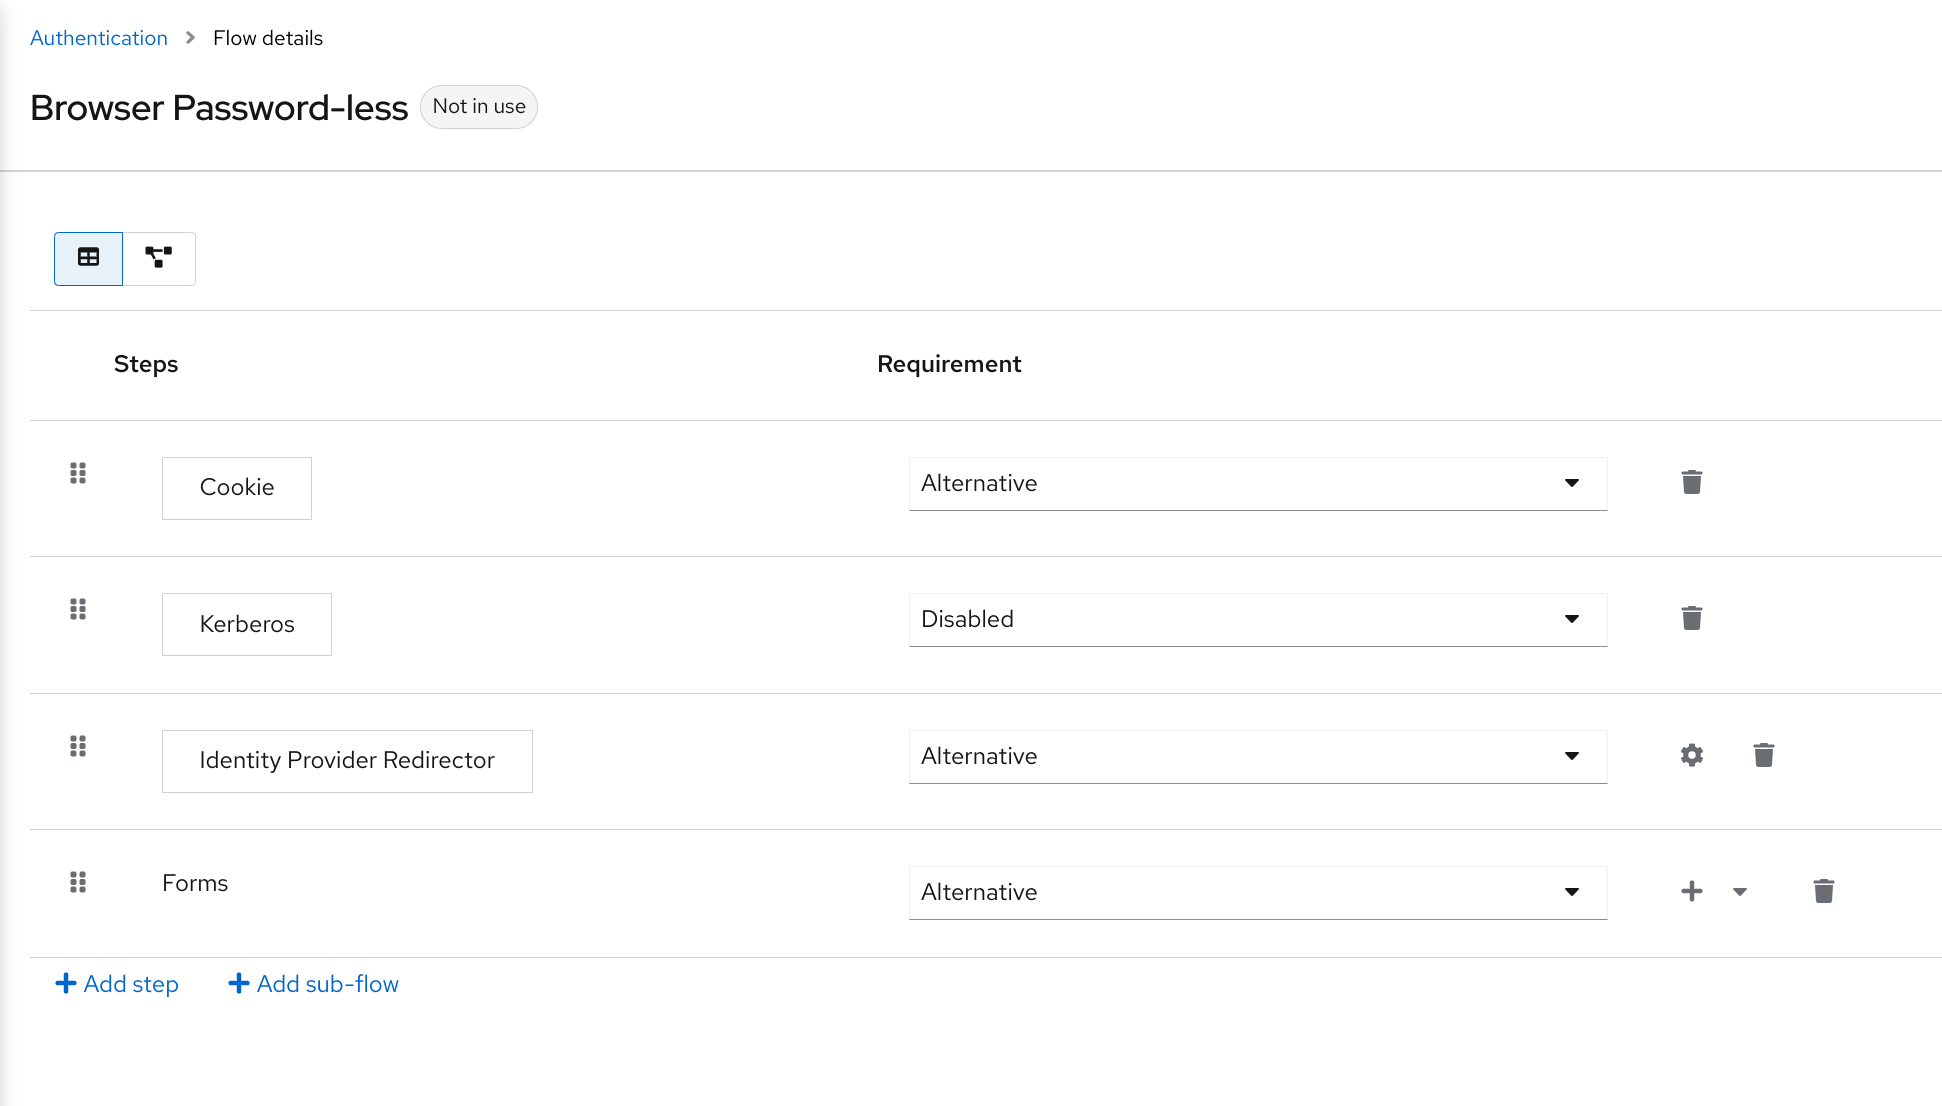
-
Click + menu of the Forms execution.
-
Select Add step.
-
Select Username Form from the list.
-
Click Add.
At this stage, the form requires a username but no password. We must enable password authentication to avoid security risks.
-
Click + menu of the Forms sub-flow.
-
Click Add sub-flow.
-
Enter
Authenticationas name. -
Click Add.
-
Select Required for the Authentication authentication type to set its requirement to required.
-
Click + menu of the Authentication sub-flow.
-
Click Add step.
-
Select Webauthn Passwordless Authenticator from the list.
-
Click Add.
-
Select Alternative for the Webauthn Passwordless Authenticator authentication type to set its requirement to alternative.
-
Click + menu of the Authentication sub-flow.
-
Click Add sub-flow.
-
Enter
Password with OTPas name. -
Click Add.
-
Select Alternative for the Password with OTP authentication type to set its requirement to alternative.
-
Click + menu of the Password with OTP sub-flow.
-
Click Add step.
-
Select Password Form from the list.
-
Click Add.
-
Select Required for the Password Form authentication type to set its requirement to required.
-
Click + menu of the Password with OTP sub-flow.
-
Click Add step.
-
Select OTP Form from the list.
-
Click Add.
-
Click Required for the OTP Form authentication type to set its requirement to required.
Finally, change the bindings.
-
Click the Action menu on the top of the screen.
-
Select Bind flow from the menu.
-
Click the Browser Flow drop-down list.
-
Click Save.
After entering the username, the flow works as follows:
If users have WebAuthn passwordless credentials recorded, they can use these credentials to log in directly. This is the password-less login. The user can also select Password with OTP because the WebAuthn Passwordless execution and the Password with OTP flow are set to Alternative. If they are set to Required, the user has to enter WebAuthn, password, and OTP.
If the user selects the Try another way link with WebAuthn passwordless authentication, the user can choose between Password and Security Key (WebAuthn passwordless). When selecting the password, the user will need to continue and log in with the assigned OTP. If the user has no WebAuthn credentials, the user must enter the password and then the OTP. If the user has no OTP credential, they will be asked to record one.
|
Since the WebAuthn Passwordless execution is set to Alternative rather than Required, this flow will never ask the user to register a WebAuthn credential. For a user to have a Webauthn credential, an administrator must add a required action to the user. Do this by:
Creating an advanced flow such as this can have side effects. For example, if you enable the ability to reset the password for users, this would be accessible from the password form. In the default
|
Creating a browser login flow with step-up mechanism
This section describes how to create advanced browser login flow using the step-up mechanism. The purpose of step-up authentication is to allow access to clients or resources based on a specific authentication level of a user.
-
Click Authentication in the menu.
-
Click the Flows tab.
-
Click Create flow.
-
Enter
Browser Incl Step up Mechanismas a name. -
Click Save.
-
Click Add execution.
-
Select Cookie from the list.
-
Click Add.
-
Select Alternative for the Cookie authentication type to set its requirement to alternative.
-
Click Add sub-flow.
-
Enter Auth Flow as a name.
-
Click Add.
-
Click Alternative for the Auth Flow authentication type to set its requirement to alternative.
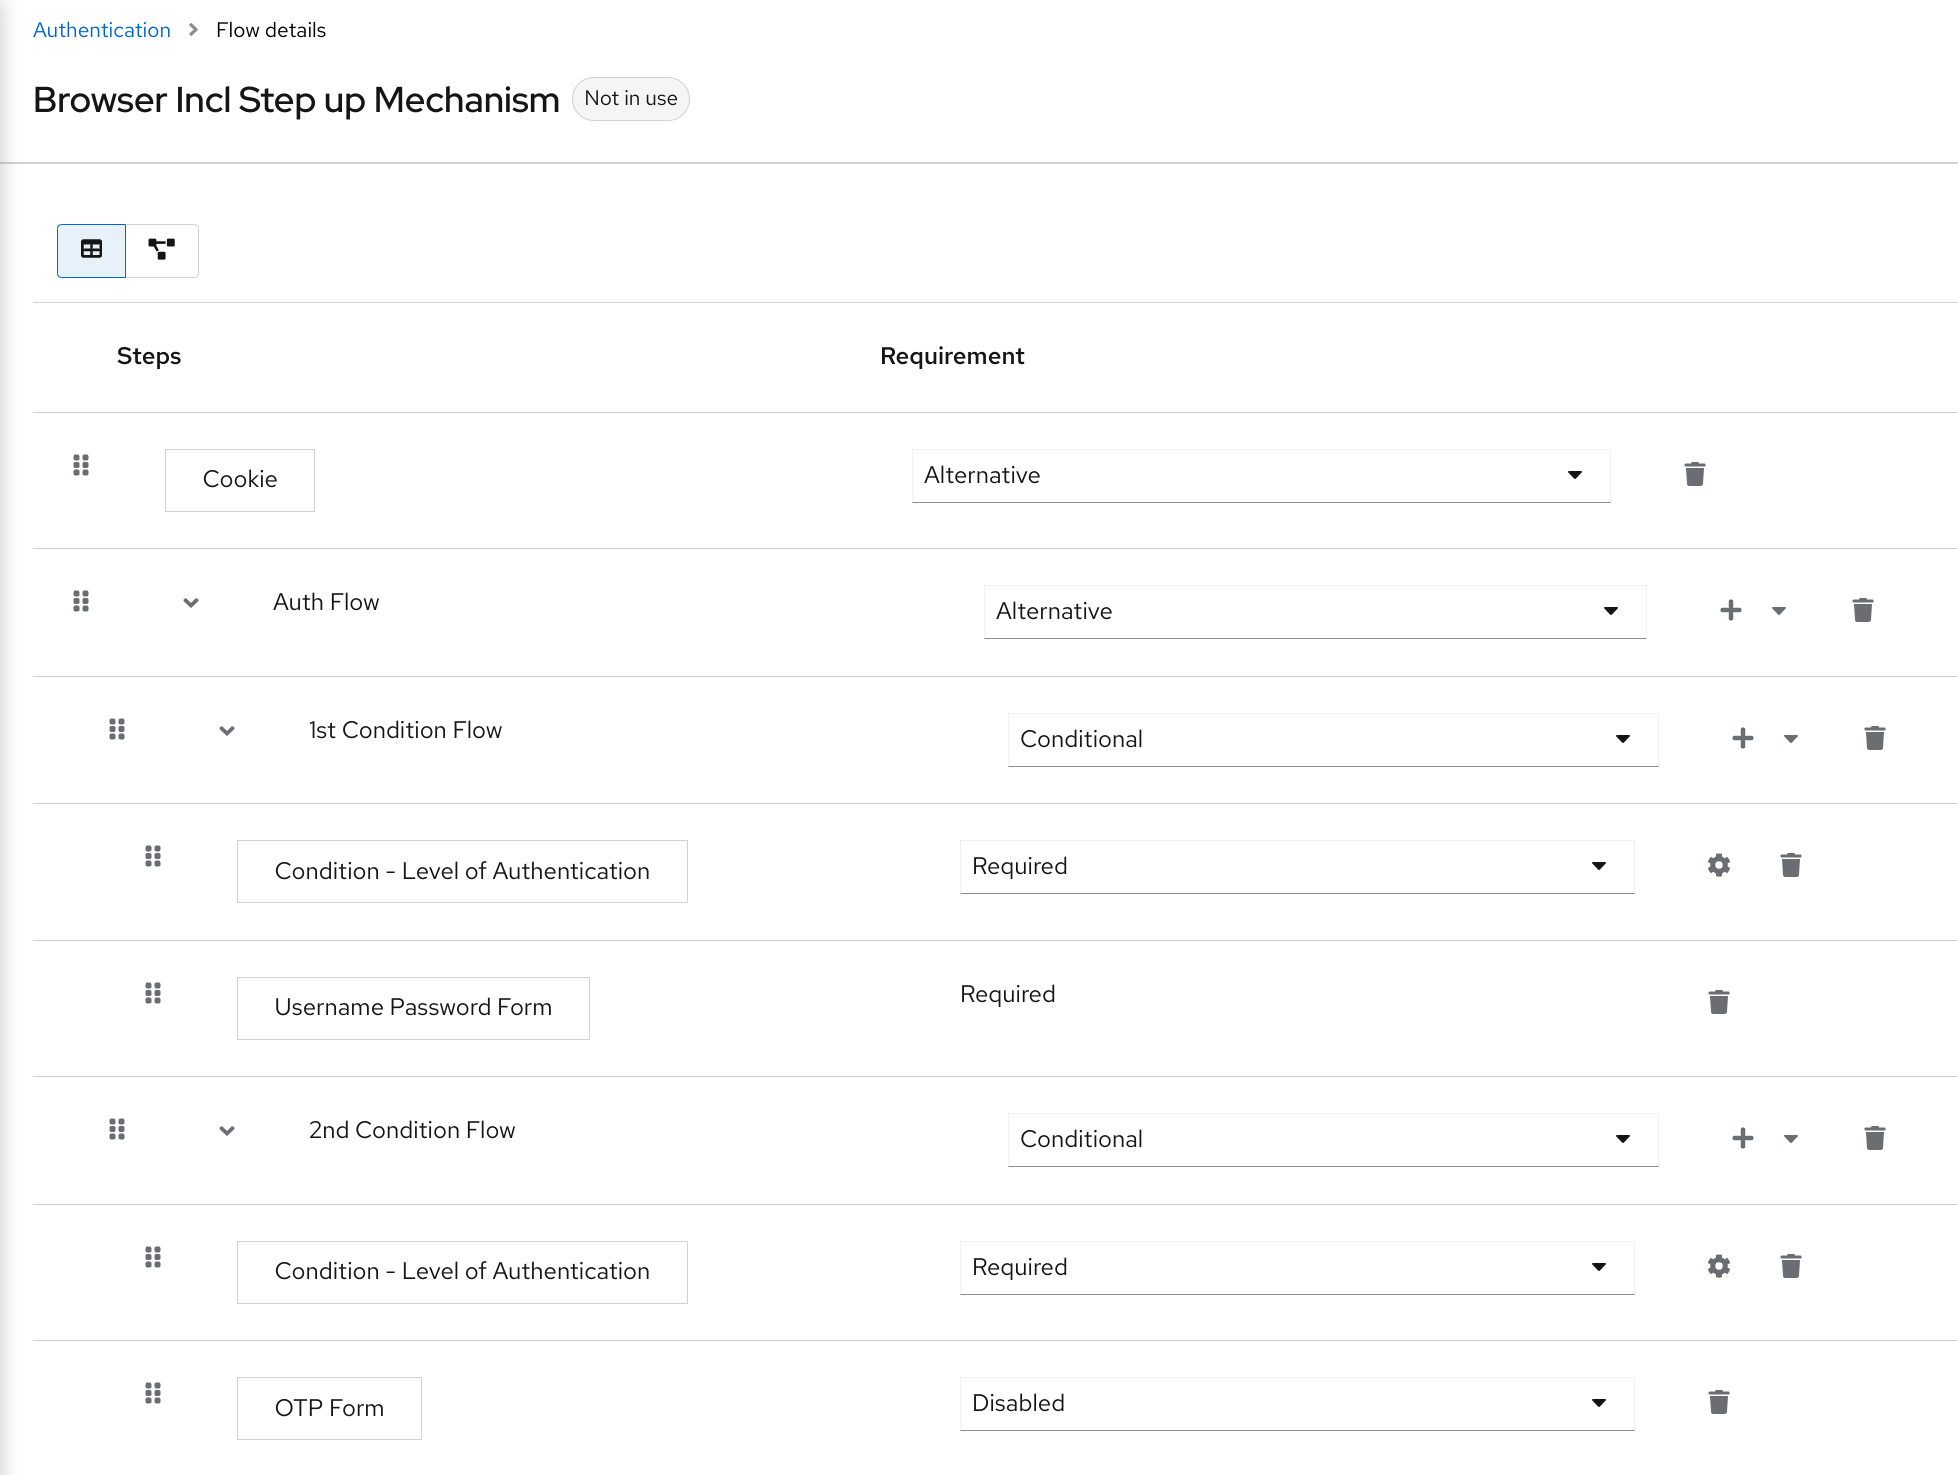
Now you configure the flow for the first authentication level.
-
Click + menu of the Auth Flow.
-
Click Add sub-flow.
-
Enter
1st Condition Flowas a name. -
Click Add.
-
Click Conditional for the 1st Condition Flow authentication type to set its requirement to conditional.
-
Click + menu of the 1st Condition Flow.
-
Click Add condition.
-
Select Conditional - Level Of Authentication from the list.
-
Click Add.
-
Click Required for the Conditional - Level Of Authentication authentication type to set its requirement to required.
-
Click + menu of the Conditional - Level Of Authentication.
-
Click ⚙️ (gear icon).
-
Enter
Level 1as an alias. -
Enter
1for the Level of Authentication (LoA). -
Set Max Age to 36000. This value is in seconds and it is equivalent to 10 hours, which is the default
SSO Session Maxtimeout set in the realm. As a result, when a user authenticates with this level, subsequent SSO logins can re-use this level and the user does not need to authenticate with this level until the end of the user session, which is 10 hours by default. -
Click Save
Configure the condition for the first authentication level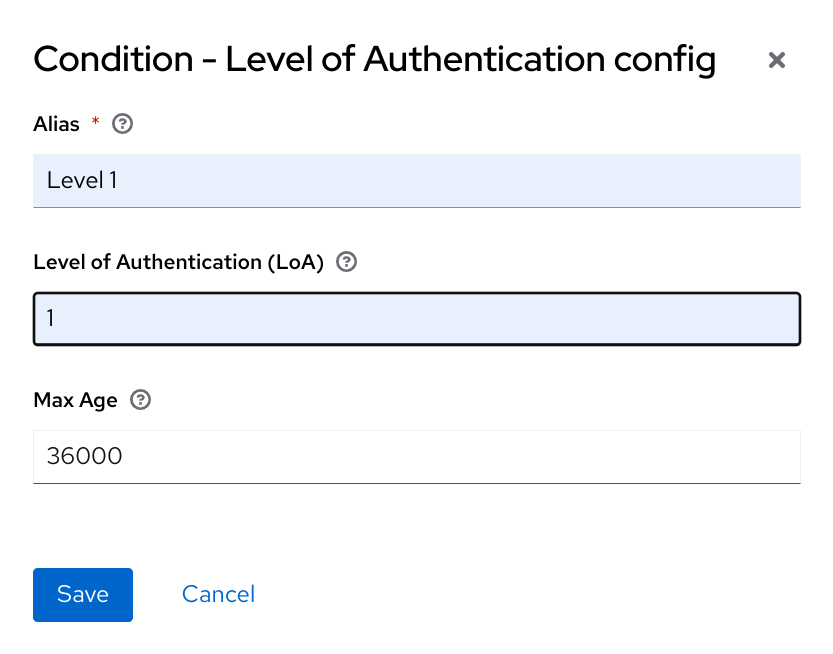
-
Click + menu of the 1st Condition Flow.
-
Click Add step.
-
Select Username Password Form from the list.
-
Click Add.
Now you configure the flow for the second authentication level.
-
Click + menu of the Auth Flow.
-
Click Add sub-flow.
-
Enter
2nd Condition Flowas an alias. -
Click Add.
-
Click Conditional for the 2nd Condition Flow authentication type to set its requirement to conditional.
-
Click + menu of the 2nd Condition Flow.
-
Click Add condition.
-
Select Conditional - Level Of Authentication from the item list.
-
Click Add.
-
Click Required for the Conditional - Level Of Authentication authentication type to set its requirement to required.
-
Click ⚙️ (gear icon).
-
Enter
Level 2as an alias. -
Enter
2for the Level of Authentication (LoA). -
Set Max Age to 0. As a result, when a user authenticates, this level is valid just for the current authentication, but not any subsequent SSO authentications. So the user will always need to authenticate again with this level when this level is requested.
-
Click Save
Configure the condition for the second authentication level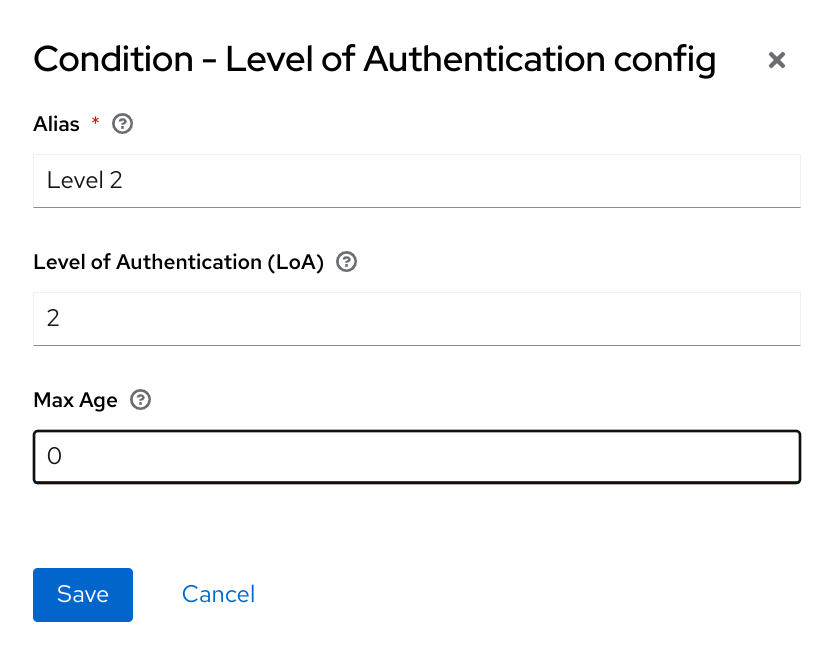
-
Click + menu of the 2nd Condition Flow.
-
Click Add step.
-
Select OTP Form from the list.
-
Click Add.
-
Click Required for the OTP Form authentication type to set its requirement to required.
Finally, change the bindings.
-
Click the Action menu on the top of the screen.
-
Select Bind flow from the list.
-
Select Browser Flow in the dropdown.
-
Click Save.
To use the step-up mechanism, you specify a requested level of authentication (LoA) in your authentication request. The claims parameter is used for this purpose:
https://{DOMAIN}/realms/{REALMNAME}/protocol/openid-connect/auth?client_id={CLIENT-ID}&redirect_uri={REDIRECT-URI}&scope=openid&response_type=code&response_mode=query&nonce=exg16fxdjcu&claims=%7B%22id_token%22%3A%7B%22acr%22%3A%7B%22essential%22%3Atrue%2C%22values%22%3A%5B%22gold%22%5D%7D%7D%7DThe claims parameter is specified in a JSON representation:
claims= {
            "id_token": {
                "acr": {
                    "essential": true,
                    "values": ["gold"]
                }
            }
        }
The Keycloak javascript adapter has support for easy construct of this JSON and sending it in the login request. See Javascript adapter documentation for more details.
You can also use simpler parameter acr_values instead of claims parameter to request particular levels as non-essential. This is mentioned
in the OIDC specification.
You can also configure the default level for the particular client, which is used when the parameter acr_values or the parameter claims with the acr claim is not present.
For further details, see Client ACR configuration.
To request the acr_values as text (such as gold) instead of a numeric value, you configure the mapping between the ACR and the LoA.
It is possible to configure it at the realm level (recommended) or at the client level. For configuration see ACR to LoA Mapping.
|
For more details see the official OIDC specification.
Flow logic
The logic for the previous configured authentication flow is as follows:
If a client request a high authentication level, meaning Level of Authentication 2 (LoA 2), a user has to perform full 2-factor authentication: Username/Password + OTP.
However, if a user already has a session in Keycloak, that was logged in with username and password (LoA 1), the user is only asked for the second authentication factor (OTP).
The option Max Age in the condition determines how long (how much seconds) the subsequent authentication level is valid. This settings helps to decide
whether the user will be asked to present the authentication factor again during a subsequent authentication. If the particular level X is requested
by the claims or acr_values parameter and user already authenticated with level X, but it is expired (for example max age is configured to 300 and user authenticated before 310 seconds)
then the user will be asked to re-authenticate again with the particular level. However if the level is not yet expired, the user will be automatically
considered as authenticated with that level.
Using Max Age with the value 0 means, that particular level is valid just for this single authentication. Hence every re-authentication requesting that level will need to authenticate again with that level. This is useful for operations that require higher security in the application (e.g. send payment) and always require authentication with the specific level.
Note that parameters such as claims or acr_values might be changed by the user in the URL when the login request is sent from the client to the Keycloak via the user’s browser.
This situation can be mitigated if client uses PAR (Pushed authorization request), a request object, or other mechanisms that prevents the user from rewrite the parameters in the URL.
Hence after the authentication, clients are encouraged to check the ID Token to doublecheck that acr in the token corresponds to the expected level.
|
If no explicit level is requested by parameters, the Keycloak will require the authentication with the first LoA
condition found in the authentication flow, such as the Username/Password in the preceding example. When a user was already authenticated with that level
and that level expired, the user is not required to re-authenticate, but acr in the token will have the value 0. This result is considered as authentication
based solely on long-lived browser cookie as mentioned in the section 2 of OIDC Core 1.0 specification.
| A conflict situation may arise when an admin specifies several flows, sets different LoA levels to each, and assigns the flows to different clients. However, the rule is always the same: if a user has a certain level, it needs only have that level to connect to a client. It’s up to the admin to make sure that the LoA is coherent. |
Example scenario
-
Max Age is configured as 300 seconds for level 1 condition.
-
Login request is sent without requesting any acr. Level 1 will be used and the user needs to authenticate with username and password. The token will have
acr=1. -
Another login request is sent after 100 seconds. The user is automatically authenticated due to the SSO and the token will return
acr=1. -
Another login request is sent after another 201 seconds (301 seconds since authentication in point 2). The user is automatically authenticated due to the SSO, but the token will return
acr=0due the level 1 is considered expired. -
Another login request is sent, but now it will explicitly request ACR of level 1 in the
claimsparameter. User will be asked to re-authenticate with username/password and thenacr=1will be returned in the token.
ACR claim in the token
ACR claim is added to the token by the acr loa level protocol mapper defined in the acr client scope. This client scope is the realm default client scope
and hence will be added to all newly created clients in the realm.
In case you do not want acr claim inside tokens or you need some custom logic for adding it, you can remove the client scope from your client.
Note when the login request initiates a request with the claims parameter requesting acr as essential claim, then Keycloak will always return
one of the specified levels. If it is not able to return one of the specified levels (For example if the requested level is unknown or bigger than configured conditions
in the authentication flow), then Keycloak will throw an error.
User session limits
Limits on the number of session that a user can have can be configured. Sessions can be limited per realm or per client.
To add session limits to a flow, perform the following steps.
-
Click Add step for the flow.
-
Select User session count limiter from the item list.
-
Click Add.
-
Click Required for the User Session Count Limiter authentication type to set its requirement to required.
-
Click ⚙️ (gear icon) for the User Session Count Limiter.
-
Enter an alias for this config.
-
Enter the required maximum number of sessions that a user can have in this realm. For example, if 2 is the value, 2 SSO sessions is the maximum that each user can have in this realm. If 0 is the value, this check is disabled.
-
Enter the required maximum number of sessions a user can have for the client. For example, if 2 is the value, then 2 SSO sessions is the maximum in this realm for each client. So when a user is trying to authenticate to client
foo, but that user has already authenticated in 2 SSO sessions to clientfoo, either the authentication will be denied or an existing sessions will be killed based on the behavior configured. If a value of 0 is used, this check is disabled. If both session limits and client session limits are enabled, it makes sense to have client session limits to be always lower than session limits. The limit per client can never exceed the limit of all SSO sessions of this user. -
Select the behavior that is required when the user tries to create a session after the limit is reached. Available bahaviors are:
-
Deny new session - when a new session is requested and the session limit is reached, no new sessions can be created.
-
Terminate oldest session - when a new session is requested and the session limit has been reached, the oldest session will be removed and the new session created.
-
-
Optionally, add a custom error message to be displayed when the limit is reached.
Note that the user session limits should be added to your bound Browser flow, Direct grant flow, Reset credentials and also to any Post broker login flow.
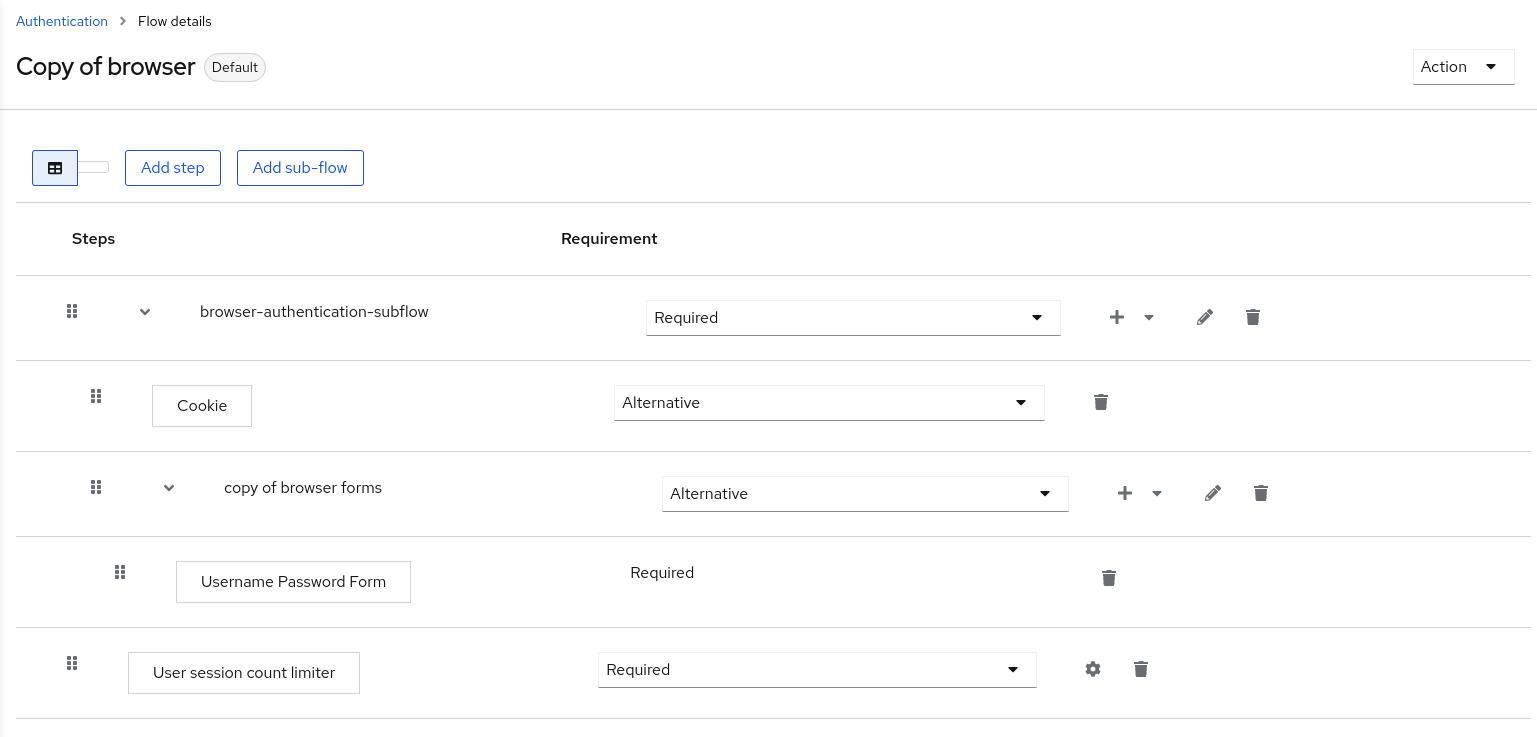
The authenticator should be added at the point when the user is already known during authentication (usually at the end of the authentication flow) and should be typically REQUIRED. Note that it is not possible to have
ALTERNATIVE and REQUIRED executions at the same level. For example for the default browser flow, it may be necessary to wrap the existing flow as a REQUIRED level-1 subflow and
add User Session Count Limiter to the same level as this new subflow. Example of such flow is below.
Currently, the administrator is responsible for maintaining consistency between the different configurations.
Note also that the user session limit feature is not available for CIBA.
Script Authenticator
Ability to upload scripts through the Admin Console and REST endpoints is deprecated.
For more details see JavaScript Providers.